
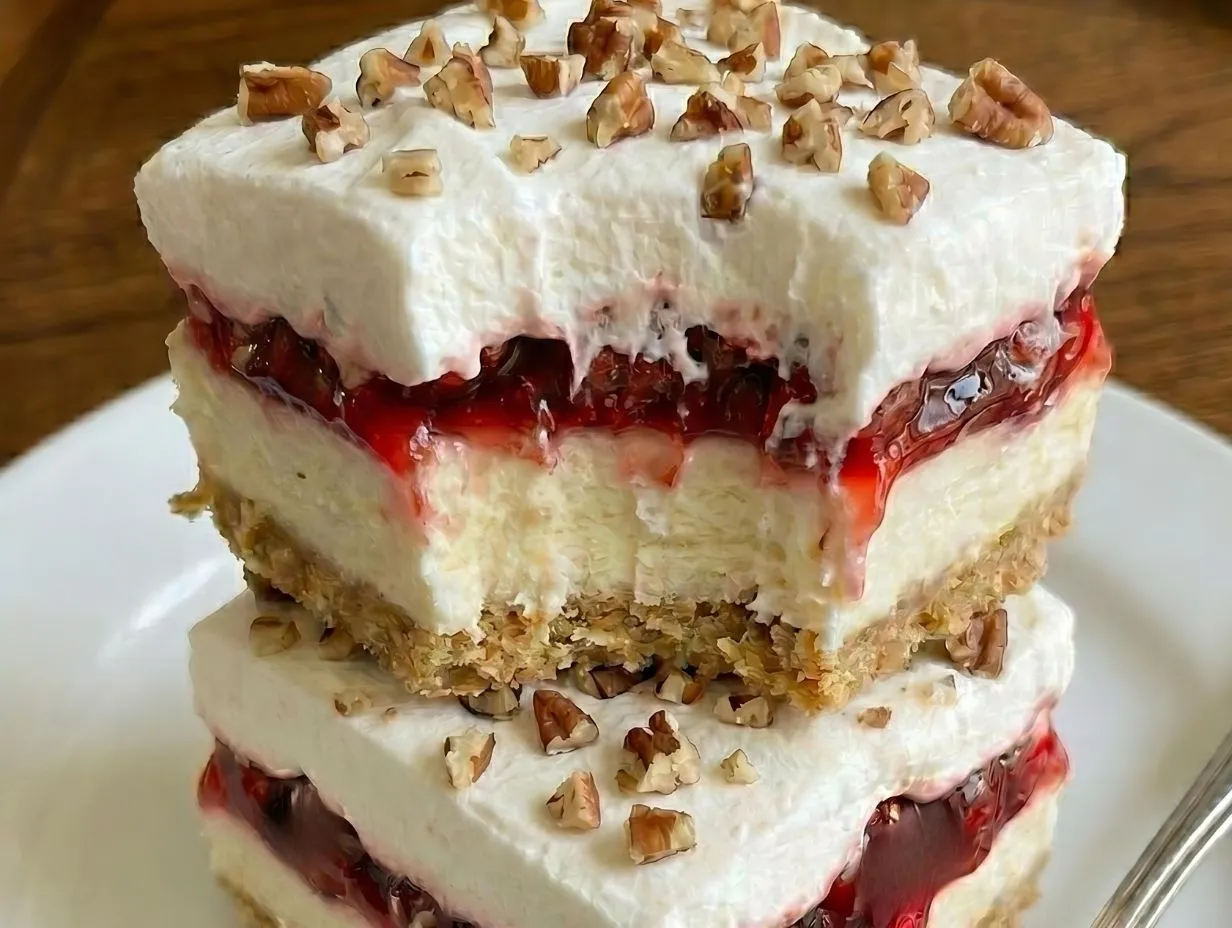
There are some desserts that just scream “potluck classic,” and this No-Bake Cherry Lush is at the top of the list. It’s a dreamy, layered dessert that combines a buttery graham cracker crust, a creamy cheesecake-like filling, sweet cherry pie filling, and a fluffy cloud of whipped topping. I first had a version of this at a family reunion years ago, and I’ve been making it for summer cookouts and holiday gatherings ever since. It’s one of those recipes that looks impressive but is secretly one of the easiest things you’ll ever make.
The beauty of a “lush” dessert is its layers of pure indulgence. Each spoonful gives you a bit of everything—the crunch of the crust, the tang of the cream cheese, the sweetness of the cherries, and the lightness of the topping. It’s a dessert that’s both rich and refreshing, making it an absolute showstopper. If you’re a fan of no-bake cherry desserts, this one is a must-try, right alongside our popular Classic Cherry Delight.
Table of Contents
Content List
Why make this No-Bake Cherry Lush recipe
Still on the fence? Here are a few reasons why this No-Bake Cherry Lush needs to be on your dessert rotation:
- Absolutely No Baking Required: Keep your kitchen cool! This recipe is perfect for hot summer days or when your oven is already occupied with other dishes during the holidays.
- Crowd-Pleasing Flavors: The combination of cherry and cheesecake is a timeless favorite that appeals to kids and adults alike. It’s a guaranteed hit at any party.
- Incredibly Easy to Assemble: With simple, straightforward steps, even beginner bakers can whip this up with confidence. The hardest part is waiting for it to chill!
- Perfect for Making Ahead: This dessert actually gets better as it sits, allowing the flavors to meld and the layers to set perfectly. It’s the ideal stress-free party prep dessert.
Ingredients
- ½ Cup butter (unsalted, plus more for greasing)
- 12 graham crackers
- 2 Tablespoons brown sugar
- 16 Ounces cream cheese (at room temperature)
- ¾ Cup powdered sugar
- 1 Teaspoon vanilla extract
- 16 Ounces whipped topping (thawed)
- 2 Cans cherry pie filling (21-Ounce cans)
- ¼ Cup pecans (or walnuts, chopped)
How to make No-Bake Cherry Lush
Step 1: Start by preparing your crust ingredients. Melt the butter in a small, microwave-safe bowl. Heat it in 30-second bursts until it’s fully melted, then set it aside. Next, generously grease a 9×13-inch baking dish with butter or shortening.
Step 2: In the bowl of a food processor, add the graham crackers and brown sugar. Pulse them together until the crackers are broken down into fine, even crumbs. With the processor running on low, slowly stream in the melted butter until the mixture looks like wet sand.
Step 3: Pour the crumb mixture into your greased baking dish. Use the bottom of a flat glass or a measuring cup to press the crumbs down firmly and evenly across the base of the dish. This creates a sturdy foundation for your layers. Pop the crust into the freezer for 15-20 minutes to firm up.
Step 4: While the crust is chilling, it’s time to make the delicious cheesecake layer. In a large bowl, combine the room-temperature cream cheese, powdered sugar, and vanilla extract. Use an electric mixer to beat the ingredients together until the mixture is completely smooth and free of lumps.
Step 5: Gently fold in half of the thawed whipped topping (about 8 ounces) into the cream cheese mixture. You can use your mixer on low speed or a spatula to combine it until it’s just incorporated. Be careful not to overmix, as you want to keep the filling light and airy.
Step 6: Retrieve your firm crust from the freezer. Spoon the cheesecake mixture over the crust and use an offset spatula or the back of a spoon to spread it into an even layer, reaching all the corners.
Step 7: Now for the star of the show! Pour both cans of cherry pie filling over the cheesecake layer. Gently spread the filling out to cover the entire surface.
Step 8: Top the cherry layer with the remaining whipped topping. Carefully spread it out, being mindful not to mix it into the cherry filling below. You want clean, distinct layers.
Step 9: Cover the dish with plastic wrap and transfer it to the refrigerator. Let it chill for at least 6 hours, although chilling it overnight is highly recommended for the best flavor and texture. This gives the dessert time to set up properly.
Step 10: Just before serving, sprinkle the top with chopped pecans or walnuts, if you like. Slice, serve chilled, and enjoy every bite!
How to serve No-Bake Cherry Lush

This dessert is best served cold, straight from the refrigerator. The chill keeps the layers firm and the flavors bright and refreshing. Slice it into squares and serve on dessert plates. It’s a fantastic standalone dessert, but a dollop of extra whipped cream or a few fresh cherries on the side never hurts! It’s the perfect dessert to bring to BBQs, holiday dinners, or any potluck-style gathering.
How to store No-Bake Cherry Lush
Leftovers are a treat! To store this cherry lush, cover the baking dish tightly with plastic wrap or transfer slices to an airtight container. It will keep well in the refrigerator for up to 4 days. The crust may soften slightly over time, but it will still be delicious. You can also freeze this dessert for up to one month. For best results, freeze it without the nut topping. Let it thaw in the refrigerator for several hours before serving.
Tips to make No-Bake Cherry Lush
- Room Temperature is Key: For the creamiest, smoothest cheesecake layer, make sure your cream cheese is truly at room temperature. Cold cream cheese will result in a lumpy filling.
- Press the Crust Firmly: Don’t be shy when pressing the graham cracker crumbs into the pan. A tightly packed crust holds together much better when you slice and serve the dessert.
- Chill, Chill, Chill: The hardest part of this recipe is waiting, but don’t rush the chilling time! It’s essential for the layers to set properly, making it easy to slice and serve clean portions.
- Get Creative with Fillings: While cherry is classic, feel free to experiment with other pie fillings like blueberry, strawberry, or even lemon. If you love this layered style, our No Bake Cherry Cheesecake Bars offer a similar, equally delicious experience.
FAQs About No-Bake Cherry Lush
Can I use a different type of crust?
Absolutely! While graham crackers are classic, you could also use crushed vanilla wafers, shortbread cookies, or even crushed Oreos (chocolate and cherry are a fantastic combination) for the crust.
What if I don’t have a food processor?
No problem! You can make the crust without one. Place the graham crackers in a large, sealed zip-top bag, press out the air, and use a rolling pin or a heavy can to crush them into fine crumbs. Then, transfer the crumbs to a bowl and mix in the sugar and melted butter by hand.
Can I use homemade whipped cream instead of whipped topping?
Yes, you can use homemade whipped cream. However, store-bought whipped topping is stabilized and holds its shape longer. If you use homemade whipped cream, it’s best to stabilize it by adding 1-2 tablespoons of powdered sugar and a tablespoon of cornstarch or instant vanilla pudding mix while whipping. This will help it stay fluffy and not weep in the refrigerator.
Final Thoughts
No-Bake Cherry Lush is the ultimate easy, make-ahead dessert that never fails to impress. With its beautiful layers and classic, comforting flavors, it’s a recipe that will earn a permanent spot in your collection. It’s simple enough for a weeknight treat but special enough for a celebration. Give it a try—you’ll be so glad you did!
Hungry for more? Follow us on Pinterest for daily recipes!
Print
Easy No-Bake Cherry Lush | Layered Cheesecake Dessert
- Total Time: 6 hours 25 minutes
- Yield: 12 servings 1x
- Diet: Vegetarian
Description
A delicious and easy no-bake layered dessert featuring a buttery graham cracker crust, a creamy cheesecake filling, sweet cherry pie filling, and a light whipped topping.
Ingredients
½ Cup butter (unsalted, plus more for greasing)
12 graham crackers
2 Tablespoons brown sugar
16 Ounces cream cheese (at room temperature)
¾ Cup powdered sugar
1 Teaspoon vanilla extract
16 Ounces whipped topping (thawed)
2 Cans cherry pie filling (21-Ounce cans)
¼ Cup pecans (or walnuts, chopped)
Instructions
- Step 1: Grease a 9 x 13-inch baking dish. Melt the butter in a microwave-safe bowl in 30-second intervals and set aside.
- Step 2: In a food processor, pulse the graham crackers and brown sugar into fine crumbs. With the processor on low, slowly add the melted butter until the mixture resembles wet sand.
- Step 3: Pour the crumbs into the greased dish and use the flat bottom of a glass to press them firmly into the base. Place the crust in the freezer for 15 to 20 minutes until firm.
- Step 4: While the crust is freezing, add the cream cheese, powdered sugar, and vanilla extract to a large bowl and beat with an electric mixer until smooth.
- Step 5: Add half of the whipped topping to the cream cheese mixture and beat at low speed until everything is thoroughly combined.
- Step 6: Spoon the cheesecake layer over the firm crust and spread it evenly. Pour both cans of cherry pie filling on top and spread. Finally, top with the remaining whipped topping, smoothing it carefully.
- Step 7: Cover the dessert with plastic wrap and chill in the refrigerator for at least 6 hours.
- Step 8: Top with chopped pecans or walnuts, if desired, and serve chilled.
Notes
Chilling the dessert overnight is best for optimal firmness.
Ensure the cream cheese is at room temperature for a smoother, lump-free filling.
Topping with nuts is optional.
- Prep Time: 25 minutes
- Cook Time: 0 minutes
- Category: Dessert
- Method: No-Bake
- Cuisine: American