
When the holiday season rolls around, I always crave a dessert that’s as festive as it is delicious. And this No-Bake Peppermint Cheesecake hits the spot every single time. Creamy, smooth, and bursting with peppermint flavor, it’s everything you want in a holiday dessert—and the best part? No oven required! It’s the perfect treat for when you want to impress without the hassle.
Let’s dive into the magic of this peppermint cheesecake that will be the star of your dessert table!
Ingredients
Crust:
- 30 Oreo cookies, crushed
- 8 tbsp unsalted butter, melted
Filling:
- 24 ounces cream cheese, softened
- 1/2 cup granulated sugar
- 1 cup powdered sugar
- 1 tsp vanilla extract
- 1/4 tsp peppermint extract (or more to taste)
- 1 1/4 cups heavy whipping cream
- 1/3 cup crushed candy canes or peppermint candies
- Red gel food coloring
How to Make No-Bake Peppermint Cheesecake
Step 1: Prepare the Crust
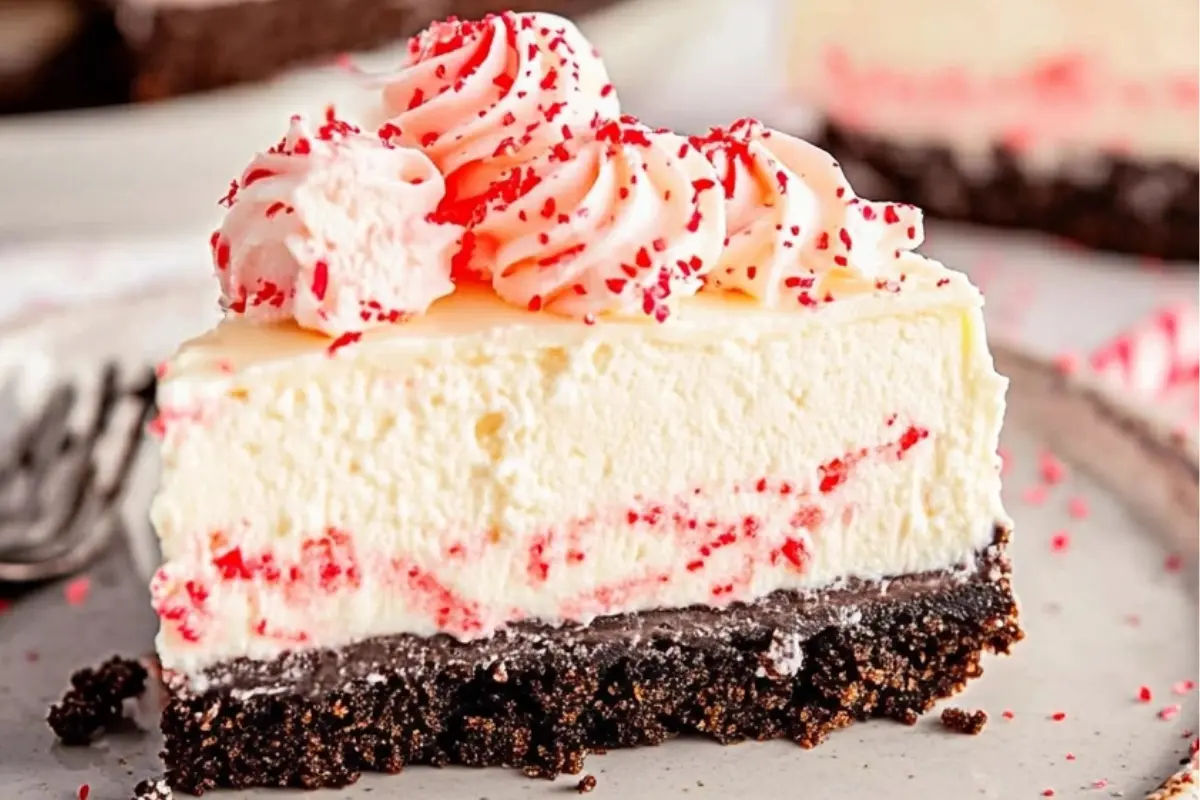
Start by crushing the Oreo cookies into fine crumbs using a food processor. Slowly drizzle the melted butter into the crumbs while pulsing the food processor. Stir everything with a spatula to make sure the crumbs are evenly coated with butter. Press the mixture firmly into the bottom (and slightly up the sides) of a 9-inch springform pan. Pop the crust into the freezer while you work on the filling.
Step 2: Whip the Filling
In a large mixing bowl, whip the softened cream cheese with an electric hand mixer until it’s smooth and creamy. Add in the granulated sugar and powdered sugar, and continue mixing. Next, add the vanilla extract and peppermint extract. Set aside.
Step 3: Whip the Cream
In a separate medium-sized bowl, whip the heavy cream until stiff peaks form. Be careful not to over-whip it! Once whipped, gently fold the cream into the cream cheese mixture. This keeps the filling light and fluffy. Taste the filling and add more peppermint extract if you like a stronger minty flavor.
Step 4: Add Candy Canes and Color
Now, fold in the crushed candy canes for that iconic peppermint crunch. Divide the filling into two separate bowls. Add red gel food coloring to one of the bowls, stirring until you get a lovely pink shade that makes the cheesecake look as fun as it tastes.
Step 5: Assemble the Cheesecake
Dollop both the pink and white fillings into the prepared crust, alternating between the two to create a marbled effect. Smooth the top of the cheesecake with a spatula, cover it, and let it chill in the fridge for at least 6 hours (but overnight is even better!).
Step 6: Serve and Enjoy!
Once the cheesecake has set, remove the outer ring of the springform pan. Slice it up and serve with your favorite toppings like whipped cream or even more crushed candy canes for extra festive flair!
Details and nutritional information
Details:
- Prep Time: 20 minutes
- Refrigeration Time: 6 hours (or overnight)
- Total Time: 6 hours 20 minutes
- Yield: 12 servings
Nutrition (per serving):
- Serving Size: 1 slice
- Calories: 579 kcal
- Sugar: 35g
- Cholesterol: 116mg
Helpful Tips
- Chill time is key! Let the cheesecake set in the fridge for a full 6-8 hours, or even better, overnight. This helps it firm up properly for perfect slices.
- Peppermint perfection: Be cautious with the peppermint extract. Start with 1/4 teaspoon, and adjust to taste. Peppermint is strong, so a little goes a long way!
- Crust options: Not a fan of Oreos? Swap them out for graham crackers or chocolate wafer cookies.
Substitutions and Variations
- No candy canes? You can substitute crushed peppermint candies instead.
- Vary the crust: Graham cracker crusts also work wonderfully with this recipe for a slightly lighter base.
- Different flavors: While peppermint is perfect for the holidays, you can easily swap it for other extracts like almond or orange for a different twist!
Frequently Asked Questions
Can I make this cheesecake ahead of time?
Yes! In fact, it’s better to make it the day before so it has plenty of time to chill and set. You can prepare it up to 2 days in advance.
Can I freeze this cheesecake?
Absolutely! You can freeze the whole cheesecake or individual slices. Just wrap it tightly in plastic wrap and foil, and it will keep for up to 2 months. When you’re ready to enjoy it, let it thaw in the fridge overnight.
What if I don’t have a springform pan?
You can use a regular pie dish, but a springform pan is ideal for this recipe because it allows for easy slicing and a clean presentation.
Storage Instructions
Store any leftover peppermint cheesecake covered in the fridge for up to 5 days. Make sure it’s properly sealed to keep it fresh.
More Festive Recipes to Try:
I hope this cheesecake becomes your new holiday favorite! With its creamy texture, minty flavor, and no-bake ease, it’s a showstopper that you’ll want to make every season. Happy baking (well, technically chilling!) and enjoy every festive bite!
PrintNo-Bake Peppermint Cheesecake: The Ultimate Festive Dessert
- Author: Olivia Chenn
- Total Time: 6 hours 20 minutes
- Yield: 12 servings 1x
- Diet: Vegetarian
Description
This No-Bake Peppermint Cheesecake is the ultimate holiday dessert! Creamy, smooth, and bursting with peppermint flavor, it’s a fun and festive treat that’s sure to impress. With an Oreo crust and a mix of red and white filling, it’s as beautiful as it is delicious. No baking required—just chill and serve! Perfect for holiday parties or family gatherings
Ingredients
Crust:
- 30 Oreo cookies, crushed
- 8 tbsp unsalted butter, melted
Filling:
- 24 ounces cream cheese, softened
- 1/2 cup granulated sugar
- 1 cup powdered sugar
- 1 tsp vanilla extract
- 1/4 tsp peppermint extract (or more to taste)
- 1 1/4 cups heavy whipping cream
- 1/3 cup crushed candy canes or peppermint candies
- Red gel food coloring
Instructions
- Prepare the crust: In a food processor, crush the Oreo cookies into fine crumbs. Slowly add the melted butter and pulse until combined. Press the mixture into the bottom of a 9-inch springform pan and slightly up the sides. Place in the freezer.
- Whip the filling: In a large bowl, whip the softened cream cheese with an electric mixer until smooth. Add the granulated sugar and powdered sugar, mixing until combined. Stir in vanilla and peppermint extracts.
- Whip the cream: In a separate bowl, whip the heavy cream to stiff peaks. Gently fold it into the cream cheese mixture until smooth. Taste and add more peppermint extract if desired.
- Add color and candy: Fold in the crushed candy canes. Divide the filling into two bowls, and color one with red food coloring until it reaches your preferred pink shade.
- Assemble: Dollop both the pink and white fillings into the prepared crust, alternating colors to create a swirl effect. Smooth the top, cover, and refrigerate for at least 6 hours or overnight.
- Serve: Once set, remove the springform ring, slice, and serve with extra toppings like whipped cream and crushed candy canes.
Notes
- For extra decoration, add a dollop of whipped cream and a sprinkle of crushed candy canes on top.
- Adjust the amount of peppermint extract to suit your taste—start small, as it’s quite strong.
- This cheesecake can be made up to 2 days ahead of time.
- Prep Time: 20 minutes
- Cook Time: 6 hours (or overnight)
- Category: Dessert
- Method: No-bake
- Cuisine: American
Nutrition
- Serving Size: 1 slice
- Calories: 579 kcal
- Sugar: 35g
- Cholesterol: 116mg