
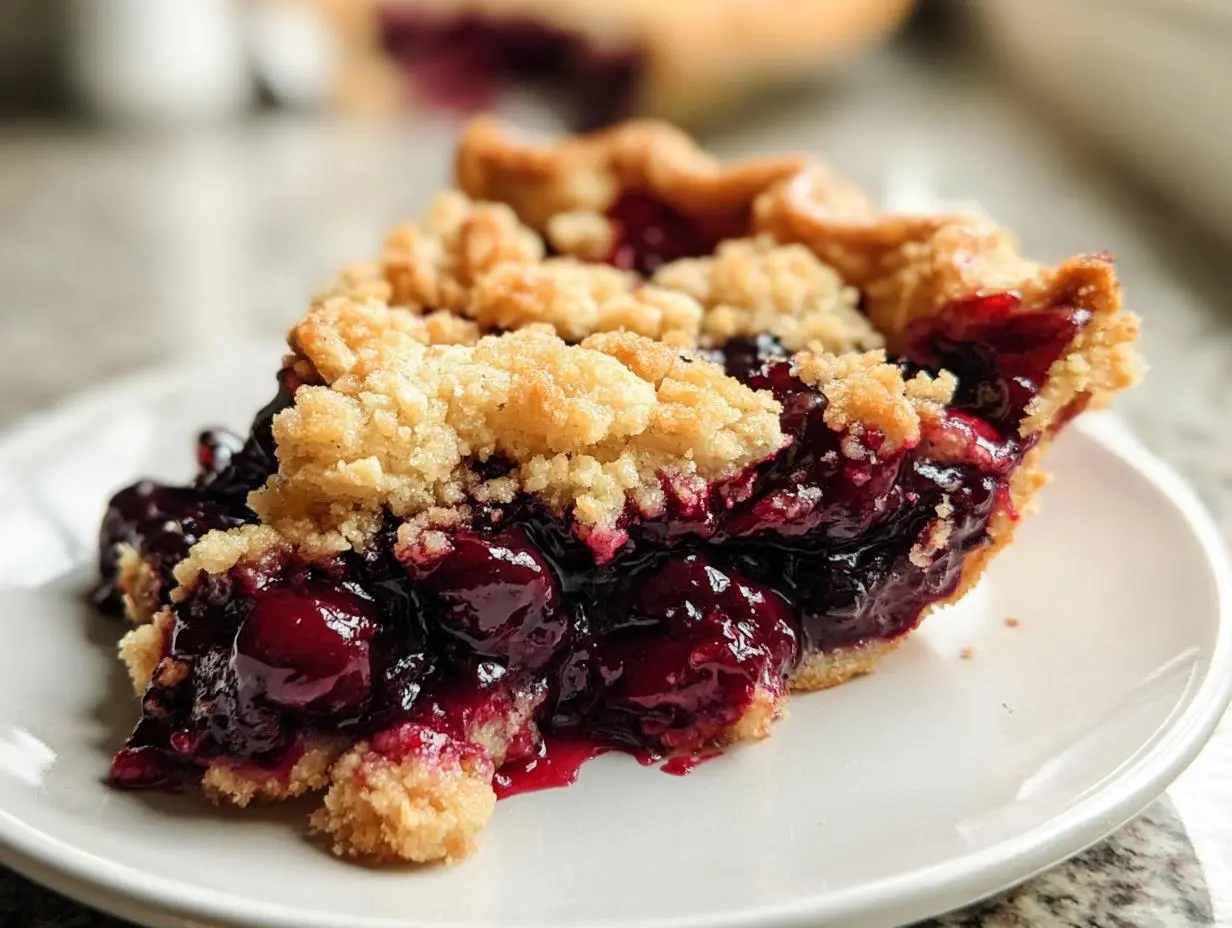
There’s something truly special about a homemade cherry pie. The deep, ruby-red filling bubbling under a golden topping is the stuff of dessert dreams. But what if you get a craving in the middle of January, when fresh cherries are nowhere to be found? That’s where the magic of frozen cherries comes in. This Dark Cherry Pie with Frozen Cherries delivers all the classic, comforting flavor you love, any time of year. The filling is a perfect balance of sweet and tart, enhanced with a hint of almond, all nestled in a flaky crust and topped with an irresistible buttery crumb topping.
Using frozen fruit is a fantastic way to enjoy your favorite bakes year-round. If you find yourself with extra frozen cherries, you should also try this Easy Cherry Crisp: A Classic Dessert with Fresh or Frozen Cherries, which offers a similar comforting vibe with an oaty streusel.
Table of Contents
Table of Contents
Why make this recipe
You might be wondering what makes this cherry pie stand out. Here’s why you’ll fall in love with this recipe:
Year-Round Perfection: No need to wait for cherry season! This recipe is specifically designed for frozen dark sweet cherries, so you can bake a show-stopping pie for Thanksgiving, Christmas, or a random Tuesday in March.
Easier Than Lattice: Let’s be honest, weaving a perfect lattice crust can be intimidating. This recipe features a simple, buttery crumb topping that’s incredibly easy to make but looks and tastes just as impressive. It provides a wonderful crunchy contrast to the soft, juicy filling.
Perfectly Thick Filling: Say goodbye to runny, soupy pies. By pre-cooking the filling with cornstarch, we ensure it thickens up beautifully and sets perfectly for clean, gorgeous slices every time.
Deep, Rich Flavor: We use dark sweet cherries for their intense flavor and beautiful color. A splash of lemon juice brightens everything up, while vanilla and almond extracts add a layer of warmth and complexity that makes this pie truly unforgettable.
Ingredients
- 1 9-inch pie crust (homemade or store-bought)
- 2 pounds frozen dark sweet cherries (thawed and drained (about 5 cups cherries))
- ¾ cup granulated sugar
- ½ cup reserved cherry juice
- ¼ cup cornstarch
- 1 tablespoon freshly squeezed lemon juice
- 1 teaspoon vanilla extract
- 1 teaspoon almond extract
- ½ teaspoon salt
- 1 cup all-purpose flour
- ½ cup light brown sugar
- ½ cup unsalted butter (melted)
How to make Dark Cherry Pie with Frozen Cherries
Step 1: Begin by preparing your oven and crust. Preheat the oven to 350°F. Gently press your pie crust into a 9-inch pie dish and place it in the refrigerator to stay chilled while you work on the filling. A cold crust helps ensure a flakier result.
Step 2: In a large saucepan, create the luscious cherry filling. Combine the thawed and drained cherries, the ½ cup of reserved cherry juice, granulated sugar, cornstarch, lemon juice, vanilla extract, almond extract, and salt. Cook this mixture over medium heat, stirring it constantly to prevent sticking.
Step 3: Continue stirring until the sugar has completely dissolved and the mixture begins to bubble and noticeably thicken. This process should take about 5 to 7 minutes. Once thickened, remove the saucepan from the heat and set it aside to cool for at least 15–20 minutes. It’s important to let it cool slightly so it doesn’t melt the butter in your pie crust.
Step 4: While the filling cools, prepare the crumb topping. In a food processor, add the all-purpose flour and light brown sugar. Pulse a few times just to combine them. Pour in the melted butter and pulse again until the mixture forms coarse, sandy crumbs. For extra texture, use your hands to pinch the mixture together to form larger crumbles and clusters. If you don’t have a food processor, simply use a fork or your fingertips in a medium bowl to mix the ingredients until crumbly.
Step 5: Now it’s time to assemble your pie. Pour the cooled cherry filling into the chilled pie crust and spread it out into an even layer. Generously sprinkle the crumb topping all over the filling, making sure to cover the entire surface right to the edges.
Step 6: Carefully place the pie on a baking sheet (to catch any potential drips) and bake for 50 to 60 minutes. The pie is done when the crumb topping is a beautiful golden brown and the filling is bubbling thickly around the edges. If you notice the crust edges are browning too quickly, you can loosely cover them with strips of aluminum foil.
Step 7: Once baked, remove the pie from the oven and place it on a wire rack to cool completely. This is the hardest part! You must let the pie cool for at least 2 to 3 hours before slicing. This allows the filling to fully set, ensuring perfect, non-runny slices.
How to serve Dark Cherry Pie with Frozen Cherries

This dark cherry pie is an absolute dream when served warm. The contrast between the warm, gooey cherry filling and a cold scoop of vanilla bean ice cream is pure bliss. A simple dollop of freshly whipped cream or even a drizzle of heavy cream also works wonders. While it’s fantastic warm, this pie is just as delicious served at room temperature, making it a perfect make-ahead dessert for gatherings.
How to store Dark Cherry Pie with Frozen Cherries
To store leftover pie, cover it loosely with plastic wrap or foil. It can be kept at room temperature for up to 2 days. For longer storage, refrigerate the covered pie for up to 5 days. You can enjoy it cold straight from the fridge or gently reheat individual slices in the microwave for about 20-30 seconds. You can also freeze the pie, either whole or in individual slices, for up to 3 months. Thaw it in the refrigerator overnight before serving.
Tips to make Dark Cherry Pie with Frozen Cherries
Drain Those Cherries: The most crucial step for a perfect pie is to thoroughly thaw and drain your frozen cherries. After thawing, press them gently to release excess liquid. This prevents a soggy bottom crust and a watery filling. Don’t discard all that liquid—remember to reserve ½ cup for the filling!
Don’t Overmix the Topping: For a tender, crumbly topping, mix just until the butter is incorporated and the mixture looks like coarse sand with some larger clumps. Overmixing can create a tough, dense topping.
Protect Your Crust: Pie crust edges tend to brown faster than the rest of the pie. Keep an eye on it, and if it’s getting too dark, create a ring out of aluminum foil to shield the edges for the remainder of the baking time.
Patience is a Virtue: I can’t stress this enough—let the pie cool completely! Slicing into a hot pie will result in a soupy mess, as the filling needs time to set. Waiting 2-3 hours is essential for those picture-perfect slices.
Love the Topping? If you’re a fan of easy, rustic fruit desserts, the topping style is similar to what you’d find on a classic cobbler. For another delightful cherry treat, check out this Cherry Cobbler Recipe: A Juicy Dessert with a Sweet Cookie Twist!
FAQs About Dark Cherry Pie with Frozen Cherries
Can I use fresh cherries for this recipe?
Absolutely! If you’re lucky enough to have fresh cherries, you can substitute them. You’ll need about 5-6 cups of pitted cherries. Since fresh cherries won’t release as much juice as frozen ones, you may need to add about ¼ to ½ cup of water or apple juice to the saucepan when making the filling.
Why is my pie filling runny?
A runny filling is usually due to one of two things. First, the filling may not have been cooked long enough on the stovetop. It’s important to bring it to a bubble and let it thicken for the full 5-7 minutes. Second, the pie was likely cut while still too warm. The filling continues to set as it cools, so letting it rest for at least 2-3 hours is key to a firm slice.
Can I use a different type of fruit?
Yes, this recipe is quite versatile. You could easily swap the cherries for frozen blueberries, raspberries, or a mixed berry blend. The cooking time and measurements for the filling should remain roughly the same. Just be sure to thaw and drain the fruit properly.
Hungry for more? Follow us on Pinterest for daily recipes!
Final Thoughts
This Dark Cherry Pie with Frozen Cherries is proof that you don’t need fresh, in-season fruit to create a truly spectacular dessert. It’s a comforting, satisfying, and deeply flavorful pie that’s perfect for any occasion. The combination of the rich cherry filling and the buttery, crunchy streusel is a match made in heaven. Give this recipe a try, and you’ll have a new go-to dessert that’s sure to impress your family and friends!
Print
Easy Dark Cherry Crumble Pie with Frozen Cherries
- Total Time: 4 hours 20 minutes
- Yield: 8 servings 1x
- Diet: Vegetarian
Description
A delicious homemade pie featuring a sweet dark cherry filling and a buttery crumb topping, made conveniently with frozen cherries.
Ingredients
1 9-inch (23 cm) pie crust, homemade or store-bought
2 pounds frozen dark sweet cherries, thawed and drained
¾ cup granulated sugar
½ cup reserved cherry juice
¼ cup cornstarch
1 tablespoon freshly squeezed lemon juice
1 teaspoon vanilla extract
1 teaspoon almond extract
½ teaspoon salt
1 cup all-purpose flour
½ cup light brown sugar
½ cup unsalted butter, melted
Instructions
- Step 1: Preheat the oven to 350°F (175°C). Place the pie crust into a 9-inch pie dish and refrigerate until ready to use.
- Step 2: In a large saucepan, combine the cherries, reserved cherry juice, granulated sugar, cornstarch, lemon juice, vanilla extract, almond extract, and salt.
- Step 3: Cook the filling over medium heat, stirring constantly, until the mixture thickens and bubbles, which should take about 5 to 7 minutes.
- Step 4: Remove the saucepan from the heat and let the filling cool for 15 to 20 minutes.
- Step 5: While the filling cools, prepare the crumb topping. In a food processor or a bowl, combine the all-purpose flour and light brown sugar.
- Step 6: Pour in the melted butter and pulse or mix with a fork until the mixture resembles coarse crumbs. Use your hands to form small clusters for extra texture.
- Step 7: Pour the cooled cherry filling into the refrigerated pie crust and spread it evenly.
- Step 8: Sprinkle the crumb topping evenly over the filling, covering the entire surface.
- Step 9: Bake for 50 to 60 minutes, until the topping is golden brown and the filling is bubbling. If the crust edges brown too quickly, cover them with foil.
- Step 10: Let the pie cool on a wire rack for at least 2 to 3 hours before slicing to allow the filling to set.
Notes
Thaw and drain the frozen cherries before use, but be sure to reserve ½ cup of the juice for the filling.
Allowing the pie to cool for at least 2 to 3 hours is crucial for the filling to set properly before slicing.
- Prep Time: 20 minutes
- Cook Time: 60 minutes
- Category: Dessert
- Method: Bake
- Cuisine: American