
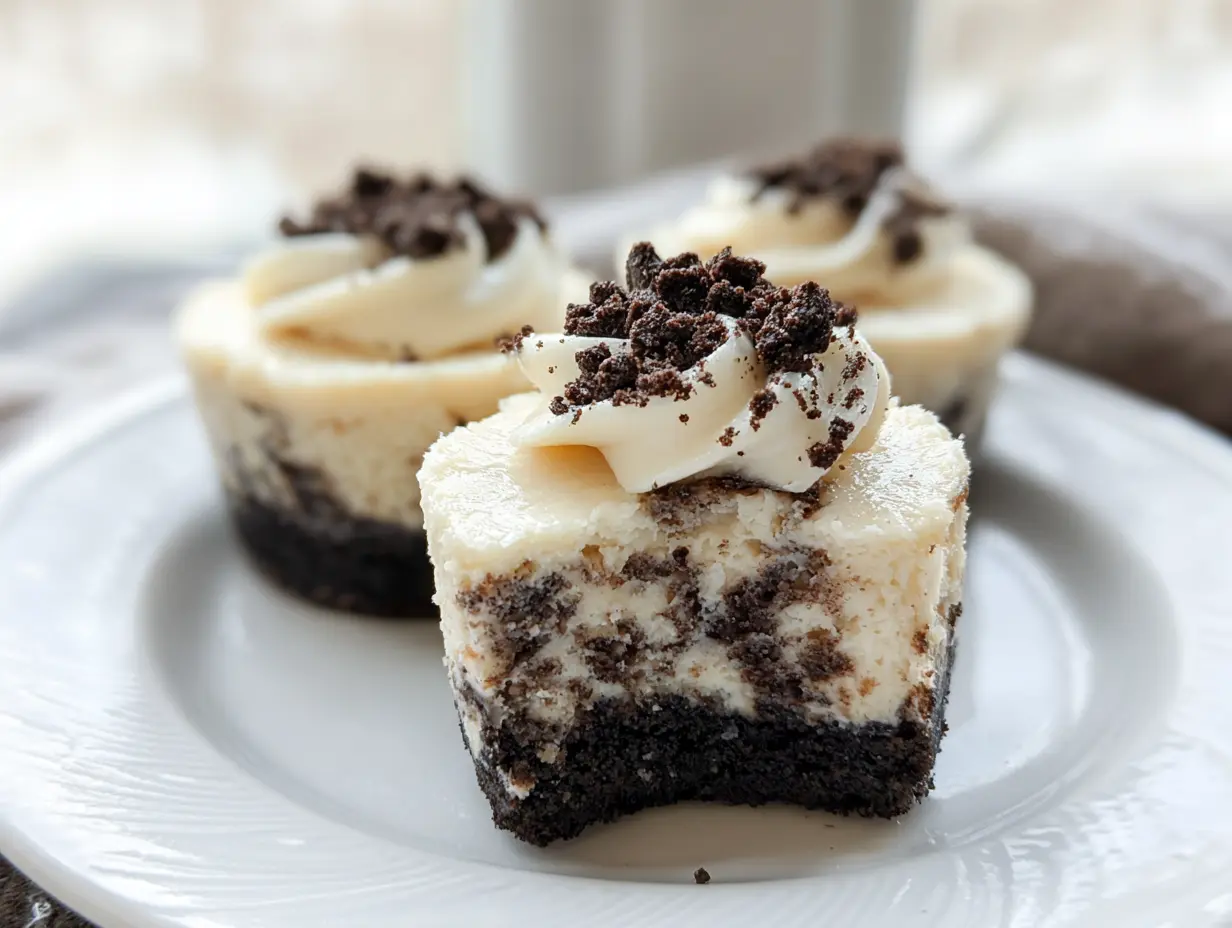
There’s something universally loved about the classic combination of cookies and cream. It’s a flavor that brings back childhood memories and pure, simple joy. I’ve captured that magic in these Mini Oreo Cheesecakes, a dessert that has become my go-to for everything from potlucks to late-night cravings. Each bite is a perfect harmony of a crunchy chocolate cookie crust, a rich and tangy cream cheese filling, and delightful chunks of Oreo cookies. They are incredibly simple to whip up and deliver all the decadent flavor of a full-sized cheesecake without any of the fuss.
Why make this recipe
If you’re looking for a dessert that’s guaranteed to be a hit, this is it. These individual cheesecakes are perfectly portioned, which makes them ideal for parties, bake sales, or simply keeping a sweet treat on hand in the fridge. Unlike traditional cheesecake, this recipe requires no complicated water bath, so you get a flawless, creamy result every time. The crust is made from just two ingredients, and the filling comes together in minutes. They’re a fantastic make-ahead dessert that looks and tastes impressive with minimal effort.
Ingredients
- 12 Oreos
- 2 tablespoons butter, melted
- 12 ounces brick-style cream cheese, softened to room temperature
- 1/4 cup sour cream, room temperature
- 1/3 cup granulated sugar
- 1 teaspoon vanilla extract
- 1 large egg, room temperature
- 6 Oreos, crushed
How to make Mini Oreo Cheesecakes
Ready to create these little bites of heaven? Follow these simple steps for perfect Oreo cheesecake bites every time.
Step 1: Preheat your oven to 325°F. Thoroughly grease a 12-count mini cheesecake pan with nonstick spray. If you’re using a standard 12-count muffin pan, line each cup with a paper liner for easy removal later on.
Step 2: To make the crust, place 12 whole Oreos into a food processor or blender and pulse until they become fine crumbs. Transfer the crumbs to a small bowl and pour in the melted butter. Stir until the mixture resembles wet sand and all the crumbs are evenly moistened.
Step 3: Spoon the crumb mixture evenly into the 12 prepared pan cavities. Use the back of a spoon or your fingers to press the crumbs down firmly, creating a compact and even layer. Bake the crusts for 5 minutes. Once done, remove them from the oven and set them aside to cool while you prepare the filling. Keep the oven on at 325°F.
Step 4: In a large mixing bowl or the bowl of a stand mixer with the paddle attachment, beat the softened cream cheese on medium speed until it’s completely smooth and free of lumps.
Step 5: Add the sour cream, granulated sugar, and vanilla extract to the bowl. Mix until everything is smooth and well combined. Remember to scrape down the sides of the bowl with a spatula to ensure all ingredients are incorporated.
Step 6: Reduce the mixer speed to low and add the egg, mixing only until it’s just barely combined. Overmixing the egg can cause the cheesecakes to crack. Gently fold the 6 crushed Oreos into the batter with a spatula.
Step 7: Divide the cheesecake filling evenly among the 12 crusts. Return the pan to the oven and bake for 15 to 17 minutes. The cheesecakes are done when the centers are set and no longer look wet.
Step 8: Remove the pan from the oven and let the cheesecakes cool on a wire rack at room temperature for at least one hour. Afterward, cover the pan tightly with plastic wrap and transfer it to the refrigerator to chill for a minimum of 2 to 3 hours, or preferably overnight. Once fully chilled, carefully remove the cheesecakes from the pan, serve, and enjoy!
How to serve Mini Oreo Cheesecakes

These mini cheesecakes are delicious on their own, but a little garnish can make them extra special. For a classic look, top each cheesecake with a dollop of whipped cream and a whole Mini Oreo. You can also drizzle them with chocolate or caramel sauce just before serving. For an extra pop of Oreo flavor, sprinkle some additional Oreo crumbs over the top. Serve them chilled straight from the refrigerator for the best texture and flavor.
How to store Mini Oreo Cheesecakes
Proper storage is key to keeping your cheesecakes fresh and delicious. Once they have completely cooled and chilled, you can store them in an airtight container in the refrigerator for up to 5 days.
If you want to freeze them for later, place the individual cheesecakes on a baking sheet and freeze until firm, about 1-2 hours. Then, wrap each one tightly in plastic wrap, followed by a layer of aluminum foil. They can be stored in the freezer for up to 2 months. To thaw, simply unwrap and let them sit in the refrigerator overnight.
Tips to make
- Use Room Temperature Ingredients: This is the most important tip for a smooth, lump-free cheesecake filling! Set your cream cheese, sour cream, and egg on the counter about an hour before you begin.
- Don’t Overmix the Egg: When you add the egg, mix on low speed and only until it’s just incorporated. Overbeating incorporates too much air, which can cause the cheesecakes to puff up and then crack as they cool.
- Muffin Pan Alternative: No mini cheesecake pan? No problem! A standard muffin pan with cupcake liners works perfectly. The liners make removal incredibly easy.
- Crushing the Oreos: If you don’t have a food processor, you can place the Oreos in a zip-top bag and crush them with a rolling pin or a heavy can. For the crushed Oreos in the filling, a few bigger chunks add a great texture.
FAQs About Mini Oreo Cheesecakes
Can I use a different cookie for the crust?
Absolutely! While Oreos are classic, you can easily substitute them. Nutter Butters, Biscoff cookies, or even chocolate chip cookies would make a delicious crust. Just use the same amount and process them into crumbs.
Why did my mini cheesecakes crack?
Cracking is usually caused by one of two things: overmixing the batter (especially after adding the egg) or overbaking. Mix the egg on low speed just until it disappears, and pull the cheesecakes from the oven as soon as the center is set. A little jiggle is okay.
Can I make these ahead of time?
Yes, this is a perfect make-ahead dessert! They actually need several hours to chill and set properly. You can make them a day or two in advance and keep them covered in the refrigerator until you’re ready to serve.
Hungry for more? Follow us on Pinterest for daily recipes!
Final Thoughts
These Mini Oreo Cheesecakes are a dessert dream come true. They pack all the rich, creamy goodness of a full-sized cheesecake into a perfect, party-ready portion. With a crunchy cookie crust and a smooth, Oreo-studded filling, they are simple to make and impossible to resist. Give this recipe a try—it’s sure to become a new favorite in your dessert rotation!
Print
Easy & Creamy Mini Oreo Cheesecake Recipe
- Total Time: 225 minutes
- Yield: 12 servings 1x
- Diet: Vegetarian
Description
Delicious and easy-to-make mini cheesecakes featuring a crunchy Oreo crust and a creamy, rich filling packed with more Oreo pieces.
Ingredients
12 Oreos
2 tablespoons (28 grams) butter, melted
12 ounces brick-style cream cheese, softened to room temperature
1/4 cup (60 grams) sour cream, room temperature
1/3 cup (65 grams) granulated sugar
1 teaspoon vanilla extract
1 large egg, room temperature
6 Oreos, crushed
Instructions
- Step 1: Preheat the oven to 325°F. Spray a 12-count mini cheesecake pan with nonstick spray, or line a standard muffin pan with cupcake liners.
- Step 2: To make the crust, process 12 Oreos in a food processor into fine crumbs. Transfer to a bowl and mix with the melted butter until all crumbs are moistened.
- Step 3: Press the crumb mixture firmly and evenly into the bottom of the prepared pan cavities.
- Step 4: Bake the crusts for 5 minutes. Remove from the oven and set aside to cool, leaving the oven on.
- Step 5: To make the filling, beat the softened cream cheese in a large bowl with an electric mixer until smooth.
- Step 6: Add the sour cream, granulated sugar, and vanilla extract. Mix until well combined, scraping the sides of the bowl as needed.
- Step 7: Add the egg and mix on low speed just until combined. Gently fold in the 6 crushed Oreos with a spatula.
- Step 8: Spoon the cheesecake filling evenly over the pre-baked crusts in the pan.
- Step 9: Bake for 15 to 17 minutes, or until the tops of the cheesecakes are set.
- Step 10: Remove from the oven and allow the cheesecakes to cool at room temperature for at least 1 hour.
- Step 11: Cover the pan tightly with plastic wrap and transfer to the refrigerator to chill for at least 2 to 3 hours, or overnight.
- Step 12: Once fully chilled, carefully remove the cheesecakes from the pan, serve, and enjoy.
Notes
For easier removal when using a standard muffin pan, it is highly suggested to use cupcake liners.
Ensure the cream cheese, sour cream, and egg are at room temperature to achieve a smooth, lump-free filling.
Do not overmix the batter after adding the egg, as this can cause the cheesecakes to crack.
- Prep Time: 25 minutes
- Cook Time: 20 minutes
- Category: Dessert
- Method: Bake
- Cuisine: American