
Chocolate Magic Cake Recipe is a deceptively simple dessert that gives you layers of sponge, creamy custard, and a rich flan‐like base—all from just five basic ingredients. Whether you’re a beginner baker or someone who loves indulgent treats without fuss, this cake hits all the right notes. It’s soft, subtly chocolatey, and elegant without being complicated. In about an hour (plus chilling time), you can wow your guests or treat yourself to something truly magical. Let’s explore why this recipe is so beloved, how to make it perfectly, and tips to make it your own.
Why You’ll Love This Chocolate Magic Cake Recipe
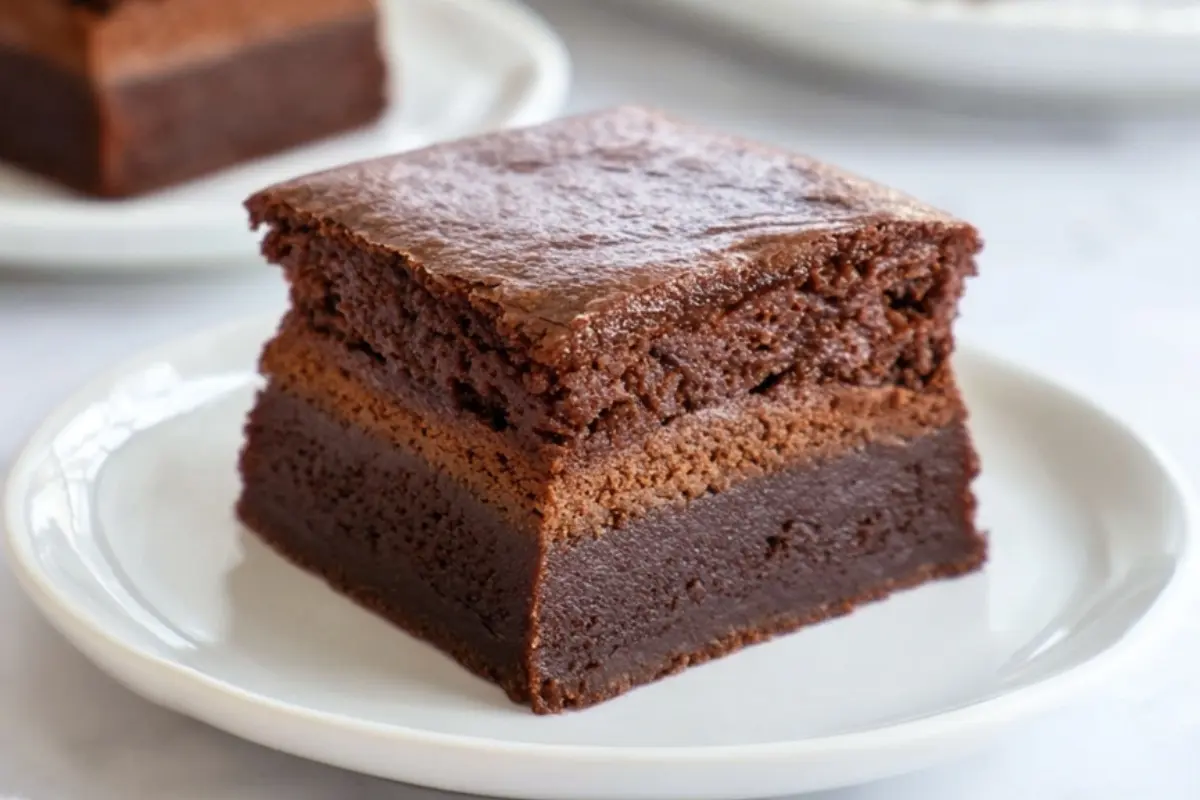
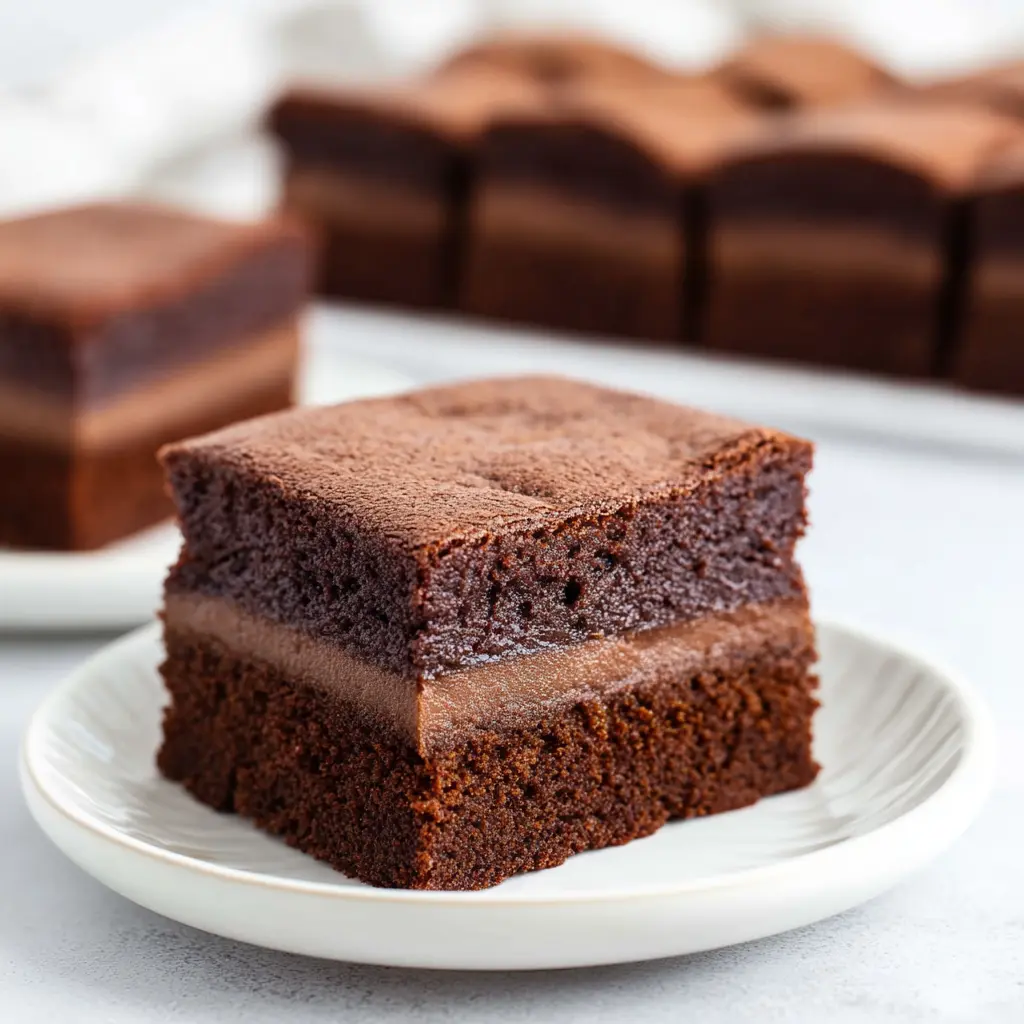
- Layered Texture Magic: It develops three distinct layers—a light sponge on top, a silky custard in the middle, and a dense, flan‑style bottom. It’s like getting multiple desserts in one.
- Minimal Ingredients, Maximum Flavor: Only eggs, cocoa powder, flour, sugar, and milk. No heavy creams, no special flavorings needed—just good technique.
- Make‑Ahead Friendly: It improves after chilling. The flavors mellow, layers firm up, and the custardy center becomes dreamy. Perfect if you want to bake ahead.
- Elegant, Yet Homey: Looks fancy enough for guests, but comforting and simple enough for a cozy night in.
- Adaptive: You can tweak textures or serving styles (warm vs. cooled) and still enjoy something delicious.
Ingredients
- 4 large eggs, separated into yolks and whites
- ¾ cup all‑purpose flour (about 96 g)
- ¼ cup unsweetened Dutch‑process cocoa powder (about 32 g)
- 1 cup granulated white sugar (about 197 g)
- 2 cups low‑fat milk (1 % or 2 %), totaling about 473 ml, divided
Step‑by‑Step: How to Make Chocolate Magic Cake Recipe
- Preheat and prepare pan
Preheat your oven to 325°F (163°C). Line an 8×8‑inch baking pan with parchment paper, leaving some overhang on the sides for easy lifting later. - Mix yolk batter
In a large bowl, combine the egg yolks, flour, cocoa powder, sugar, and ½ cup (about 120 ml) of the milk.- Add that half‑cup of milk before mixing the yolks with flour and sugar. If you attempt to mix without any milk, the flour will clump and form a paste that’s hard to smooth out later.
- Beat on high speed until the mixture is smooth, uniform in color, and free of flour lumps.
- Add remaining milk
Once you have a smooth base, pour in the rest of the milk (about 1 ½ cups). Reduce mixer speed to medium‑low, and mix just until the milk is incorporated. The batter will be very thin—this is expected. - Beat egg whites
In a clean bowl (no grease or residue), beat the egg whites on medium‑high speed until stiff peaks form. This should be done after your yolk batter is fully mixed so that the whites can go in immediately. If you beat them too early and wait, the structure can weaken and the cake may collapse. - Fold in egg whites
- Take about one third of the beaten egg whites; gently fold into the yolk batter using a spatula. Go from the bottom of the bowl upward to ensure even mixing. The batter is delicate—don’t over‑fold.
- Add the second third, fold in the same way.
- Finally fold in the last third; it’s okay if a few larger lumps remain (size of a dime or so), but don’t leave anything huge.
- Bake
Pour the combined batter into your prepared pan. Bake for 55‑60 minutes, or until the cake is puffed up and evenly browned on top. The center should not be excessively wobbly. If unsure, give it another 5 minutes rather than removing too early. - Cool strategically
When baking time is done, turn off the oven but do not remove the cake yet. Let it rest 5 minutes inside with the oven off—during this time it will deflate a bit. After that, take it out to cool completely. As it cools further, it will settle even more. - Chill (highly recommended)
While you can eat it as soon as cooled, the cake is best after chilling for a few hours or overnight. This helps the layers set, reduces any strong eggy flavor, and gives better texture in the custard portion. - Serve and store
Lift the cake using the parchment overhang, slice with a large sharp knife. Leftovers should be stored in the fridge.
Helpful Tips
- Use low-fat milk (1 % or 2 %) as directed—non‑fat is too thin, whole milk has too much fat which may lead to a thinner base layer.
- Ensure there are no yolks in the whites, and that your bowl is clean—any fat will interfere with stiff peak formation.
- Don’t over‑beat the whites—they should be stiff but not dry. Over‑beating makes them collapse.
- Fold gently and thoroughly—small lumps are okay; better that than deflating the batter.
- Timing with oven: since the batter is very liquid, it’s crucial the oven is preheated fully. Delay may affect rise and structure.
- Cooling gradually and chilling overnight really improves texture and flavor. Keep it covered to avoid absorbing fridge odors.
Substitutions And Variations
- Flour swap: You might try cake flour if available—it has lower protein, leading to a more tender sponge. If using a higher‑protein flour, the texture may be denser.
- Milk alternatives: If you want, try using 2 % fat, or swap a portion of milk with non‑dairy milk (almond or oat) but note texture may change.
- Sugar alternatives: Fine granulated sugar works best for dissolving. If substituting with coconut sugar or other sweeteners, expect changes in color and possibly texture.
- Flavor additions: A tiny pinch of salt enhances richness; you could also add a teaspoon of vanilla extract for aroma, though that adds another ingredient.
- Chocolate twist: Stir in a few dark chocolate chips into batter, or dust top with cocoa or powdered sugar.
- Serving styles: Serve warm for a softer custard center, or chilled for firmer layers. Accompany with whipped cream, berries, or ice cream.
Storage Instructions
- Once completely cooled, cover the cake (or wrap in plastic) and refrigerate. Best if stored for up to 3‑4 days.
- If chilling overnight, let rest at room temperature for 10‑20 minutes before serving if you prefer softer texture.
- Cake can also be frozen in portions—slice, wrap in plastic wrap plus foil, and freeze. Thaw in fridge overnight before serving.
Nutritional Information
| Nutrient | Amount |
|---|---|
| Calories | ~ 140 kcal |
| Carbohydrates | ~ 26 g |
| Protein | ~ 5 g |
| Total Fat | ~ 2 g |
| Saturated Fat | ~ 1 g |
| Sodium | ~ 50 mg |
| Fiber | ~ 1 g |
| Sugar | ~ 19 g |
| Net Carbs | ~ 25 g |
Serving Suggestions
- Dust the top with powdered sugar or sifted cocoa right before serving for a pretty finish.
- Serve with a dollop of whipped cream or a scoop of vanilla ice cream to contrast with the chocolate.
- Fresh berries—strawberries, raspberries, or cherries—add brightness and a touch of acidity.
- Warm slices are lovely on their own; chilled slices are more custard‑like. Pick depending on your mood.
- For presentation, cut clean slices using a hot, sharp knife (wipe blade between cuts) to preserve the layered effect.
Frequently Asked Questions About Chocolate Magic Cake
Why does the cake have three layers?
The magic happens because of the way the batter separates during baking. The beaten egg whites make the top layer sponge‑like. The middle layer remains milky/custard‑like because of the thin batter and milk content. The bottom gets denser—almost a flan or pudding base—because the heavier components sink during baking. It’s this separation that gives it its unique texture.
Can I use whole milk instead of low fat?
You can, but it will change the texture. Whole milk adds more fat which tends to thin out the base layer and reduce contrast between layers. The recipe is optimized for 1 % or 2 % milk. If using whole milk, expect a slightly softer, less defined bottom layer.
What happens if my egg whites don’t form stiff peaks?
If the whites are under‑beaten, the structure won’t hold; the cake may be dense or collapse. Ensure bowl and beater are clean and dry, no trace of yolk or grease. Beat until shiny, firm peaks that stand up on their own. It’s worth getting this step right.
Why is the cake so liquidy before baking?
That’s normal. Because a lot of the milk is added after the initial dry mix, the batter becomes very thin. Combined with whipped egg whites, that thin batter enables separation of layers. Don’t try to make it thicker—that alters the magic.
Can I bake in a larger or smaller pan?
You might, but times will vary. A deeper pan will require more time; a larger, shallower pan will be done sooner. If you go bigger, monitor the cake carefully to avoid overbaking the top while center stays loose.
How do I tell when it’s done?
Top should be golden brown and puffed. The top may wobble a little but shouldn’t slosh like uncooked batter. If unsure, bake an additional 5 minutes. Also let it rest in the oven for 5 minutes after turning off heat before removing.
Conclusion
Thank you for exploring this Chocolate Magic Cake recipe with me! I hope you’ll enjoy making it as much as I do. There’s something truly satisfying about three luscious layers emerging from just a handful of ingredients. It’s easy—but feels special. I encourage you to bake it, let it chill, taste those layers, and delight in how simple ingredients can produce something memorable. May your kitchen smell of cocoa goodness, your slices be perfect, and may every bite bring a smile. Happy baking, and enjoy every magical moment from this cake!
Join us on Pinterest for new mouthwatering recipes every day!
Print
Chocolate Magic Cake Recipe
- Total Time: 1 hour 20 minutes
- Yield: 9 slices 1x
Description
This 5 Ingredients Chocolate Magic Cake transforms simple pantry staples into three magical layers of sponge, custard, and flan. Light, creamy, and deeply chocolatey, it’s an easy yet impressive dessert perfect for any occasion.
Ingredients
4 large eggs, separated
¾ cup (96 g) all-purpose flour
¼ cup (32 g) unsweetened Dutch-process cocoa powder
1 cup (197 g) granulated white sugar
2 cups (473 ml) low-fat milk (1% or 2%), divided
Instructions
- Preheat and prepare pan
Preheat your oven to 325°F (163°C). Line an 8×8‑inch baking pan with parchment paper, leaving some overhang on the sides for easy lifting later. - Mix yolk batter
In a large bowl, combine the egg yolks, flour, cocoa powder, sugar, and ½ cup (about 120 ml) of the milk.- Add that half‑cup of milk before mixing the yolks with flour and sugar. If you attempt to mix without any milk, the flour will clump and form a paste that’s hard to smooth out later.
- Beat on high speed until the mixture is smooth, uniform in color, and free of flour lumps.
- Add remaining milk
Once you have a smooth base, pour in the rest of the milk (about 1 ½ cups). Reduce mixer speed to medium‑low, and mix just until the milk is incorporated. The batter will be very thin—this is expected. - Beat egg whites
In a clean bowl (no grease or residue), beat the egg whites on medium‑high speed until stiff peaks form. This should be done after your yolk batter is fully mixed so that the whites can go in immediately. If you beat them too early and wait, the structure can weaken and the cake may collapse. - Fold in egg whites
- Take about one third of the beaten egg whites; gently fold into the yolk batter using a spatula. Go from the bottom of the bowl upward to ensure even mixing. The batter is delicate—don’t over‑fold.
- Add the second third, fold in the same way.
- Finally fold in the last third; it’s okay if a few larger lumps remain (size of a dime or so), but don’t leave anything huge.
- Bake
Pour the combined batter into your prepared pan. Bake for 55‑60 minutes, or until the cake is puffed up and evenly browned on top. The center should not be excessively wobbly. If unsure, give it another 5 minutes rather than removing too early. - Cool strategically
When baking time is done, turn off the oven but do not remove the cake yet. Let it rest 5 minutes inside with the oven off—during this time it will deflate a bit. After that, take it out to cool completely. As it cools further, it will settle even more. - Chill (highly recommended)
While you can eat it as soon as cooled, the cake is best after chilling for a few hours or overnight. This helps the layers set, reduces any strong eggy flavor, and gives better texture in the custard portion. - Serve and store
Lift the cake using the parchment overhang, slice with a large sharp knife. Leftovers should be stored in the fridge.
Notes
Use low-fat milk for best texture—whole milk may affect layer separation.
Ensure egg whites are beaten just before folding in.
Chill overnight for firmer layers and richer flavor.
Use parchment overhang to lift and slice cleanly.
Store leftovers in the fridge for up to 4 days.
- Prep Time: 20 minutes
- Cook Time: 60 minutes
- Category: Dessert
Nutrition
- Serving Size: 1 slice
- Calories: 140 kcal
- Sugar: 19 g
- Carbohydrates: 26 g
- Protein: 5 g