

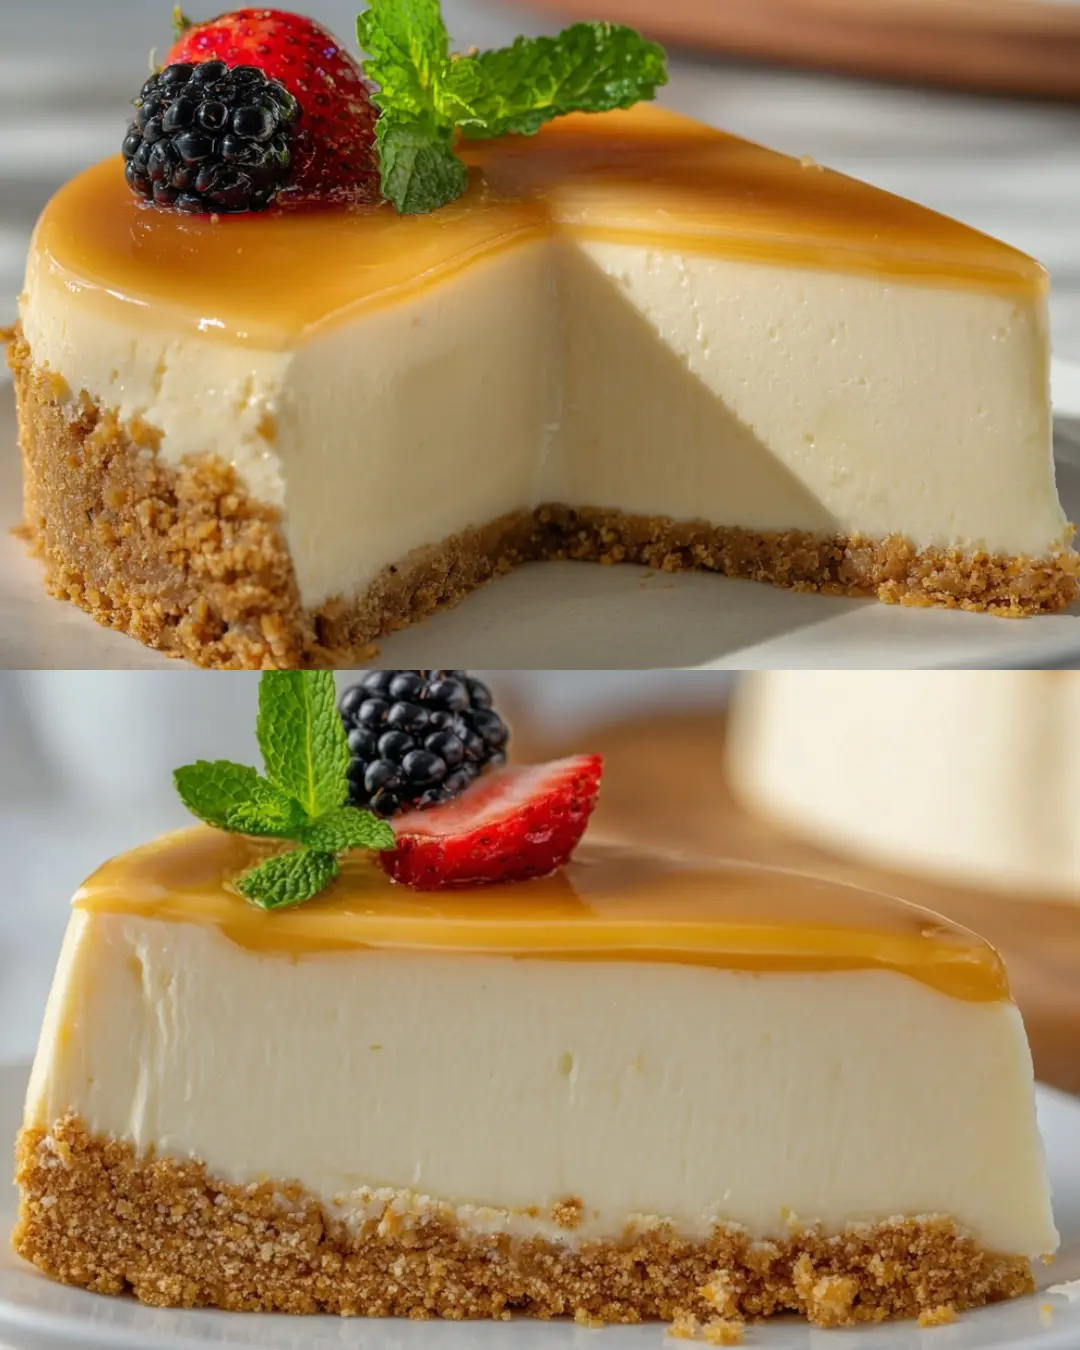
No Bake Sweetened Condensed Milk Cheesecake is the perfect creamy dessert when you want something rich, refreshing, and incredibly simple to prepare. This easy no bake cheesecake combines smooth cream cheese with sweetened condensed milk and fresh lemon juice for a beautifully balanced flavor. The buttery biscuit crust adds the perfect contrast to the silky filling, while the refrigerator does all the hard work of setting the dessert. With only 25 minutes of preparation and no oven required, this cheesecake is ideal for warm weather, busy schedules, or effortless entertaining. Every slice delivers a luscious, melt-in-your-mouth texture that feels indulgent yet wonderfully simple.
Why You’ll Love This No Bake Sweetened Condensed Milk Cheesecake
There are countless cheesecake recipes available, but this version stands out for its reliability and simplicity. Here is why this recipe deserves a permanent place in your dessert rotation:
-
No baking required, making it stress free and beginner friendly
-
Uses simple pantry staples
-
Perfectly balanced sweetness with a hint of citrus brightness
-
Creamy, smooth, and sliceable texture
-
Easy to customize with different toppings
-
Ideal make ahead dessert for gatherings
Each serving contains approximately 359 calories, making it a satisfying yet manageable indulgence. Whether you are hosting friends, celebrating a special occasion, or simply treating yourself, this cheesecake always impresses.
Ingredients
For the Crust
-
1 1/4 cups biscuit crumbs or graham cracker crumbs
-
1/3 cup melted butter or ghee
-
1/4 cup sugar slightly reduced if preferred
For the Filling
-
1 package 226 g or 8 ounces Philadelphia cream cheese softened
-
1 can 395 g or 14 ounces Nestle sweetened condensed milk
-
1/3 cup fresh lemon juice
-
1 teaspoon pure vanilla extract
Optional toppings
-
Cherry pie filling
-
Fresh berries
-
Fruit compote
-
Whipped cream
Step-by-Step How to Make No Bake Sweetened Condensed Milk Cheesecake
Step 1: Prepare the Crust
In a medium bowl, mix the biscuit crumbs, melted butter, and sugar until the texture resembles damp sand. Press the mixture firmly into the bottom of a 9 inch pie plate. Ensure the crust is tightly packed and evenly spread across the surface for a sturdy base. Place the crust in the refrigerator for 1 hour so it can firm up properly before adding the filling.
Step :2 Beat the Cream Cheese
Using a stand mixer or hand mixer, whip the softened cream cheese until it becomes smooth and fluffy. This step is essential for creating a lump free filling.
Step 3 : Incorporate the Sweetened Condensed Milk
Slowly pour in the sweetened condensed milk while mixing continuously. Beat until the mixture is smooth and fully combined. Pause occasionally to scrape down the sides of the bowl. Avoid over mixing, as this can thin the consistency.
Step 4: Add Lemon and Vanilla
Stir in the fresh lemon juice and vanilla extract. Blend just until incorporated. The lemon juice not only enhances the flavor but also helps the filling thicken naturally.
Step 5: Fill and Chill
Pour the filling into the prepared crust and smooth the top with a spatula. Cover the cheesecake and refrigerate for at least 6 to 8 hours or overnight. The longer it remains chilled, the thicker and more velvety the texture will become.
Step 6: Serve
Add your favorite topping or enjoy it plain for a classic taste. Slice and serve chilled for the best experience.
Helpful Tips
-
Always soften cream cheese at room temperature before mixing
-
Press the crust firmly to prevent crumbling when slicing
-
Chill overnight for clean, sharp slices
-
Use fresh lemon juice for brighter flavor
-
Dip a knife in warm water and wipe clean between cuts
Patience during the chilling process makes all the difference in achieving that perfectly creamy consistency.
Substitutions And Variations
This no bake cheesecake is wonderfully adaptable. Here are some creative ideas:
-
Use chocolate cookie crumbs instead of graham crackers for a chocolate crust
-
Swap lemon juice with lime juice for a tropical variation
-
Add citrus zest for extra freshness
-
Fold in mini chocolate chips for added texture
-
Use a store bought crust to save preparation time
-
Prepare individual portions in small jars for easy serving
For those who prefer less sweetness, slightly reduce the sugar in the crust. If you enjoy richer flavor, consider adding a swirl of caramel or melted chocolate before chilling.
Storage Instructions
Store leftover cheesecake tightly covered in the refrigerator for up to 5 days. Keeping it well sealed prevents it from absorbing other flavors.
To freeze, wrap each slice separately in plastic wrap and place them in an airtight container. It can be stored in the freezer for up to 2 months. Seal it well and allow it to thaw in the refrigerator before serving to maintain the best texture.
The cheesecake can be completely assembled up to 2 days in advance of serving, making it an excellent choice for entertaining. You may also prepare the crust up to 2 days ahead and refrigerate until ready to fill.
Nutritional Information
Per serving based on 12 slices:
-
Calories 359
-
Carbohydrates approximately 32 g
-
Fat approximately 22 g
-
Protein approximately 6 g
-
Sugar approximately 24 g
Nutritional values may vary depending on the specific brands used and portion sizes. Choosing reduced fat cream cheese can slightly decrease the overall calorie count while maintaining creaminess.
Serving Suggestions
This dessert pairs beautifully with a variety of flavors and beverages. Consider serving it with:
-
Fresh strawberries, raspberries, or blueberries
-
Homemade strawberry or raspberry compote
-
Classic cherry pie topping
-
A drizzle of caramel or chocolate sauce
-
Lightly sweetened whipped cream
Pair it with hot coffee, iced tea, or sparkling lemonade to create a refreshing balance of flavors. The contrast between the cool creamy cheesecake and a warm beverage is especially delightful.
Frequently Asked Questions About No Bake Sweetened Condensed Milk Cheesecake
One of the most common questions is why the cheesecake sometimes does not set properly. The main reason is not allowing enough chilling time. Refrigerating for a minimum of 6 to 8 hours is essential, though overnight chilling produces the best consistency. Over mixing can also thin the filling, so mix only until smooth.
Many readers ask whether the cheesecake can be frozen. Yes, it freezes very well for up to 2 months when properly wrapped and stored in an airtight container. Thaw it slowly in the refrigerator for optimal texture.
Fresh lemon juice is strongly recommended because it enhances both flavor and structure. Bottled juice may slightly affect the final taste. Finally, this cheesecake is perfect for preparing ahead of time. It can be made up to 2 days in advance, making it ideal for holidays and gatherings.
Final Thoughts
Thank you so much for taking the time to explore this No Bake Sweetened Condensed Milk Cheesecake recipe. It truly is one of those desserts that proves simple ingredients can create something incredibly special. I love how effortless it is to prepare, yet how rich, creamy, and flavorful every bite turns out. The smooth texture and bright hint of lemon make it a dessert that feels both comforting and refreshing. I hope you enjoy making it as much as I do and share it with people who appreciate homemade treats. Wishing you joyful moments in the kitchen and many sweet memories with every slice. Thank you for being part of this wonderful food loving community.
Print
No Bake Sweetened Condensed Milk Cheesecake
- Total Time: 6 hours 25 minutes
- Yield: 12 servings 1x
- Diet: Vegetarian
Description
No Bake Sweetened Condensed Milk Cheesecake is a smooth and creamy dessert made with rich cream cheese, sweetened condensed milk, fresh lemon juice, and a buttery biscuit crust. This easy no oven recipe sets beautifully in the refrigerator, making it perfect for warm days, gatherings, or when you need a simple make ahead dessert that always delivers consistent results.
Ingredients
For the crust:
1 1/4 cups biscuit crumbs or graham cracker crumbs
1/3 cup melted butter or ghee
1/4 cup sugar slightly reduced if preferred
For the filling:
1 package 226 g or 8 ounces cream cheese softened
1 can 395 g or 14 ounces sweetened condensed milk
1/3 cup fresh lemon juice
1 teaspoon pure vanilla extract
Optional toppings:
Cherry pie filling
Fresh berries
Fruit compote
Whipped cream
Instructions
In a medium bowl, mix the biscuit crumbs, melted butter, and sugar until the texture resembles damp sand. Press the mixture firmly into the bottom of a 9 inch pie plate. Ensure the crust is tightly packed and evenly spread across the surface for a sturdy base. Place the crust in the refrigerator for 1 hour so it can firm up properly before adding the filling.
Using a stand mixer or hand mixer, whip the softened cream cheese until it becomes smooth and fluffy. This step is essential for creating a lump free filling.
Slowly pour in the sweetened condensed milk while mixing continuously. Beat until the mixture is smooth and fully combined. Pause occasionally to scrape down the sides of the bowl. Avoid over mixing, as this can thin the consistency.
Stir in the fresh lemon juice and vanilla extract. Blend just until incorporated. The lemon juice not only enhances the flavor but also helps the filling thicken naturally.
Pour the filling into the prepared crust and smooth the top with a spatula. Cover the cheesecake and refrigerate for at least 6 to 8 hours or overnight. The longer it remains chilled, the thicker and more velvety the texture will become.
Add your favorite topping or enjoy it plain for a classic taste. Slice and serve chilled for the best experience.
Notes
For best results, chill overnight to achieve a firm and creamy texture.
Avoid over mixing the filling to maintain proper consistency.
You can use a store bought graham cracker crust to save time.
This cheesecake can be prepared up to 2 days in advance and stored in the refrigerator before serving.
To freeze, wrap slices individually and store in an airtight container for up to 2 months. Thaw in the refrigerator before serving.
- Prep Time: 25 minutes
- Cook Time: Chill Time: 6 hours
- Category: Dessert
- Method: No-Bake