
Red Velvet Poke Cake is a soft, creamy, and totally irresistible dessert that is perfect for holidays, celebrations, or anytime you want a showstopping sweet. This easy-to-follow recipe turns a classic red velvet cake into a moist, flavor‑packed treat by adding sweetened condensed milk and rich cream cheese frosting. With its vibrant color and decadent layers, this cake is ideal for Christmas parties, family gatherings, or a fun baking day with friends. Whether you are a beginner baker or a seasoned pro, you will love how simple and rewarding this dessert is to make and serve.
Why You’ll Love This Red Velvet Poke Cake
There are so many reasons why this Red Velvet Poke Cake will quickly become a favorite dessert in your home. First, it takes all the flavors you already love in red velvet cake—rich cocoa, velvety texture, and stunning color—and enhances them with creamy sweetened condensed milk that soaks into every bite. The pudding mix and sour cream help make the cake supremely moist, while the homemade cream cheese frosting adds a luscious finish that feels indulgent but not overly sweet. Plus, this recipe is perfect for holiday occasions like Christmas, where its bright red color and festive sprinkles will impress everyone.
Ingredients
Here’s everything you need to make this delightful Red Velvet Poke Cake:
For the Cake
- 1 Box Red Velvet Cake Mix
- 3.4 ounces Instant Red Velvet Pudding Mix (or chocolate or cheesecake pudding mix)
- 1 Cup Sour Cream
- 1 Cup Canola Oil
- 4 Large Eggs
- ½ Cup Whole Milk
- 14 ounces Sweetened Condensed Milk
For the Frosting
- 8 Ounces Whole Fat Cream Cheese, softened
- ¼ Cup Butter, softened
- 2 ½ Cups Powdered Sugar
- ½ teaspoon Vanilla Extract
- Christmas Sprinkles (optional but festive!)
Step-by-Step: How to Make Red Velvet Poke Cake
Step 1: Prepare Your Oven and Pan
Preheat your oven to 350°F (175°C). Grease a 9×13‑inch pan with non‑stick spray or butter, and set it aside. Check the back of your cake mix box for the standard bake time for a 9×13 pan so you can adjust accordingly.
Step 2: Mix the Cake Batter
In a large bowl, combine the red velvet cake mix, instant pudding, sour cream, canola oil, eggs, and whole milk. Use a hand mixer or stand mixer on medium speed to blend until smooth and well combined. The pudding and sour cream make this batter thicker than usual, giving the cake a super moist and tender crumb.
Step 3: Bake the Cake
Pour the batter evenly into your prepared 9×13 pan. Bake in the preheated oven for the time listed on the back of the cake mix box, plus about 10 extra minutes. This longer baking time helps ensure the cake sets properly with the added pudding and sour cream.
Step 4: Poke the Cake
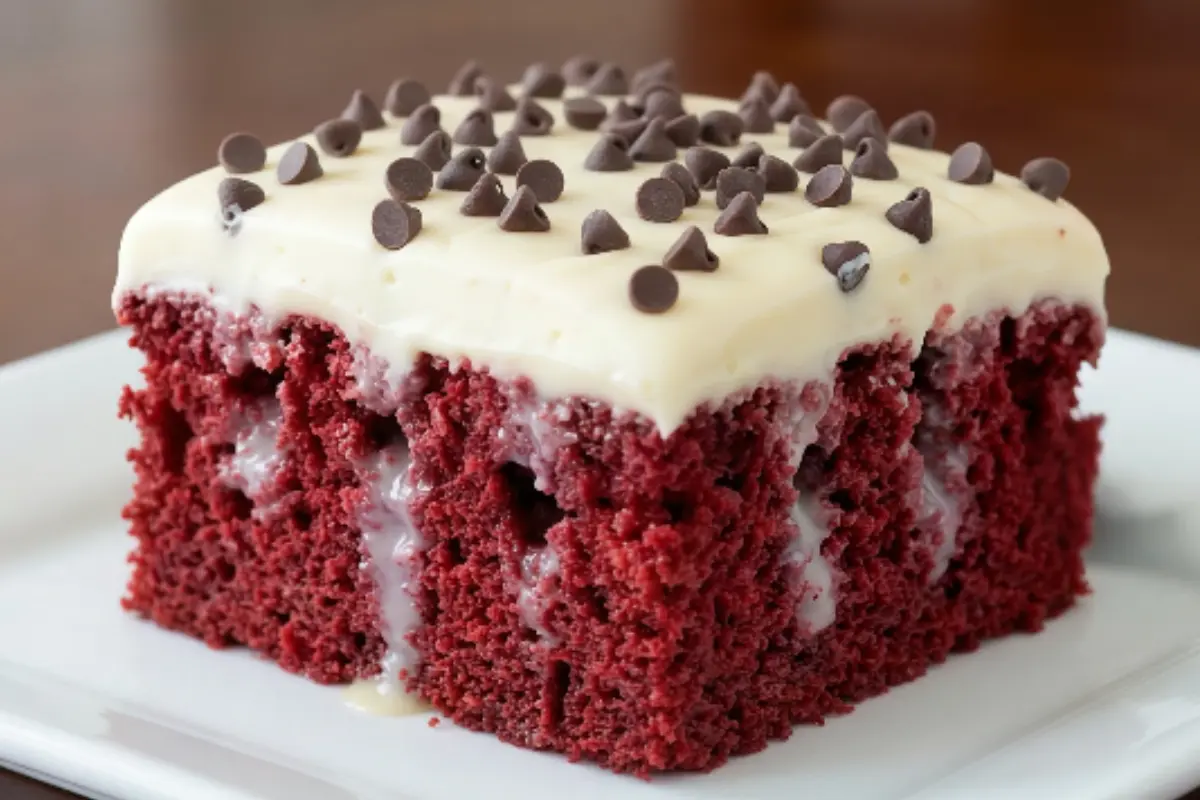
Once the cake is baked through and a toothpick inserted into the center comes out clean, remove the pan from the oven and let it cool for about 5 minutes. Use the blunt end of a wooden spoon or a thick skewer to gently poke holes all over the warm cake. These holes will allow the sweetened condensed milk to soak deep into the cake for rich flavor and moist texture.
Step 5: Add Sweetened Condensed Milk
Slowly pour the 14 ounces of sweetened condensed milk over the cake, making sure it gets into the holes you poked. Tilt the pan or use a spoon to help spread the milk evenly. This step is what transforms the cake into a truly luscious poke cake.
Step 6: Chill the Cake
Place the cake in the fridge to cool while you prepare the frosting. Let it chill for at least 10 minutes, which helps the milk soak in and the cake begin to set up before frosting.
Step 7: Make the Cream Cheese Frosting
In the bowl of a stand mixer fitted with the paddle attachment, add the softened cream cheese, butter, powdered sugar, and vanilla extract. Beat on medium‑high speed until light and fluffy, about 2–3 minutes. The frosting should be smooth with no lumps.
Step 8: Frost the Cake
Remove the chilled cake from the fridge and spread the frosting evenly over the top using a spatula or knife. Make sure the layer is smooth and even so every slice looks beautiful.
Step 9: Add Sprinkles
Finish the cake with a generous sprinkle of Christmas sprinkles or cheerful decorations such as edible glitter or colorful holiday candy accents. This step is optional, but it makes the cake extra festive and fun.
Step 10: Final Chill
Return the cake to the fridge for at least 4 hours or overnight. This helps the flavors meld and makes slicing easier. When ready to serve, slice into squares and enjoy!
Helpful Tips
- Room Temperature Ingredients: For best results, make sure your eggs, milk, cream cheese, and butter are all at room temperature before mixing. This helps everything blend more smoothly and prevents lumps in your frosting.
- Don’t Overmix: Mix the cake batter until just combined. Overmixing can lead to a tough crumb.
- Even Poking: When poking the cake, make holes about every inch or so for even absorption of the sweetened condensed milk.
- Chill Time Matters: Don’t skip the chilling step. Letting the cake cool and set results in cleaner slices and richer flavor.
- Get Creative with Decorations: Use seasonal chocolate chips, sparkly edible glitter, or festive candies instead of sprinkles for a personal touch.
Substitutions and Variations
This Red Velvet Poke Cake is versatile and easy to customize based on your tastes or dietary needs:
- Pudding Swap: If you don’t have red velvet pudding mix, use chocolate or cheesecake flavor for a twist.
- Dairy-Free Option: To make this recipe dairy-free, simply use coconut milk, plant-based sour cream, and dairy-free cream cheese as substitutes.
- Healthier Version: Use reduced-fat sour cream and milk, but keep in mind this may slightly affect texture.
- Flavor Boost: Add a teaspoon of espresso powder to the batter to intensify the chocolate notes in the red velvet.
- Festive Layers: For holidays, add colored sugar layers between the frosting and sprinkles to match seasonal themes like Valentine’s Day or Fourth of July.
Storage Instructions
Proper storage will keep your Red Velvet Poke Cake fresh and delicious:
- Refrigerator: Store leftover cake in an airtight container or covered tightly with plastic wrap for up to 5 days.
- Freezer: You can freeze individual slices in freezer-safe containers for up to 2 months. Thaw overnight in the fridge before serving.
- Avoid Drying Out: Keeping the cake covered prevents it from absorbing fridge odors and keeps the frosting from drying out.
Nutritional Information

Approximate nutritional values per serving (based on 16 servings):
- Calories: 350–420 kcal
- Fat: 18–24 g
- Carbohydrates: 45–60 g
- Sugar: 32–42 g
- Protein: 3–5 g
Keep in mind that nutritional values will vary based on specific brands of cake mix, pudding, and frosting ingredients. This cake is rich and sweet, perfect for special occasions rather than everyday eating.
Serving Suggestions
Red Velvet Poke Cake pairs wonderfully with:
- A dollop of whipped cream on each slice
- Fresh berries for a tangy counterpoint to the sweetness
- Hot coffee or cocoa for cozy dessert pairings
- Vanilla ice cream for an extra indulgent treat
- Cheerful decorations such as edible glitter or colorful holiday candy accents
- For neat slices, dip a sharp knife in hot water before cutting. Serve the cake chilled or let it come to room temperature, based on your taste.
Frequently Asked Questions About Red Velvet Poke Cake
Can I use homemade red velvet cake instead of a cake mix?
Yes! If you prefer, you can use your favorite homemade red velvet cake recipe. Just make sure the cake is sturdy enough to poke holes and absorb the sweetened condensed milk without falling apart. Adjust the baking time based on your recipe.
Do I have to use sweetened condensed milk?
The sweetened condensed milk is what gives this poke cake its signature creamy texture and rich flavor. You could substitute heavy cream mixed with sweetener, but the classic version uses condensed milk for best results.
Can I make this ahead of time?
Absolutely! This cake actually tastes better when made a day in advance because it allows more time for the flavors to meld together. Just cover and refrigerate overnight.
How do I serve it?
For clean slices, dip a sharp knife in hot water before each cut. You can serve it straight from the fridge or let it sit at room temperature for a bit, depending on how you like it.
Is this cake suitable for parties?
Yes, this cake is a crowd pleaser and ideal for holiday parties, birthdays, potlucks, and celebrations. The festive sprinkles make it especially great for Christmas gatherings.
Final Thoughts
Thank you for exploring this delicious Red Velvet Poke Cake recipe with me! I love how this rich, creamy dessert brings joy to every celebration, and I hope you feel inspired to make it for your next holiday or special occasion. With its vibrant color, smooth texture, and indulgent frosting, this cake is both a showstopper and a comforting treat. Enjoy the ease of preparation and the amazing flavors, and thank you for being part of our community of home bakers. Happy baking and happy tasting!
Print
Red Velvet Poke Cake
- Total Time: 4 hours 45 minutes
- Yield: 16 servings 1x
- Diet: Vegetarian
Description
Red Velvet Poke Cake is soft, creamy, and perfect for holidays or celebrations. With layers of rich red velvet cake, sweetened condensed milk, and smooth cream cheese frosting, it’s a guaranteed crowd-pleaser. Make it today and serve up something festive and delicious!
Ingredients
Cake:
1 box red velvet cake mix
3.4 oz instant red velvet, chocolate, or cheesecake pudding mix
1 cup sour cream
1 cup canola oil
4 large eggs
½ cup whole milk
14 oz sweetened condensed milk
Frosting:
8 oz whole fat cream cheese, softened
¼ cup butter, softened
2½ cups powdered sugar
½ tsp vanilla extract
Christmas sprinkles or decorations of choice
Instructions
Step 1: Prepare Your Oven and Pan
Preheat your oven to 350°F (175°C). Grease a 9×13‑inch pan with non‑stick spray or butter, and set it aside. Check the back of your cake mix box for the standard bake time for a 9×13 pan so you can adjust accordingly.
Step 2: Mix the Cake Batter
In a large bowl, combine the red velvet cake mix, instant pudding, sour cream, canola oil, eggs, and whole milk. Use a hand mixer or stand mixer on medium speed to blend until smooth and well combined. The pudding and sour cream make this batter thicker than usual, giving the cake a super moist and tender crumb.
Step 3: Bake the Cake
Pour the batter evenly into your prepared 9×13 pan. Bake in the preheated oven for the time listed on the back of the cake mix box, plus about 10 extra minutes. This longer baking time helps ensure the cake sets properly with the added pudding and sour cream.
Step 4: Poke the Cake
Once the cake is baked through and a toothpick inserted into the center comes out clean, remove the pan from the oven and let it cool for about 5 minutes. Use the blunt end of a wooden spoon or a thick skewer to gently poke holes all over the warm cake. These holes will allow the sweetened condensed milk to soak deep into the cake for rich flavor and moist texture.
Step 5: Add Sweetened Condensed Milk
Slowly pour the 14 ounces of sweetened condensed milk over the cake, making sure it gets into the holes you poked. Tilt the pan or use a spoon to help spread the milk evenly. This step is what transforms the cake into a truly luscious poke cake.
Step 6: Chill the Cake
Place the cake in the fridge to cool while you prepare the frosting. Let it chill for at least 10 minutes, which helps the milk soak in and the cake begin to set up before frosting.
Step 7: Make the Cream Cheese Frosting
In the bowl of a stand mixer fitted with the paddle attachment, add the softened cream cheese, butter, powdered sugar, and vanilla extract. Beat on medium‑high speed until light and fluffy, about 2–3 minutes. The frosting should be smooth with no lumps.
Step 8: Frost the Cake
Remove the chilled cake from the fridge and spread the frosting evenly over the top using a spatula or knife. Make sure the layer is smooth and even so every slice looks beautiful.
Step 9: Add Sprinkles
Finish the cake with a generous sprinkle of Christmas sprinkles or cheerful decorations such as edible glitter or colorful holiday candy accents. This step is optional, but it makes the cake extra festive and fun.
Step 10: Final Chill
Return the cake to the fridge for at least 4 hours or overnight. This helps the flavors meld and makes slicing easier. When ready to serve, slice into squares and enjoy!
Notes
For best results, bring all ingredients to room temperature before mixing.
Use a sharp knife dipped in hot water for clean slices.
You can swap red velvet pudding for chocolate or cheesecake pudding.
Store leftovers covered in the fridge for up to 5 days.
- Prep Time: 15 minutes
- Cook Time: 30 minutes Chill Time: 4 hours
- Category: Dessert
- Method: Baking
- Cuisine: American
Nutrition
- Serving Size: 1 slice
- Calories: 385
- Sugar: 37g
- Carbohydrates: 49g
- Protein: 4g