
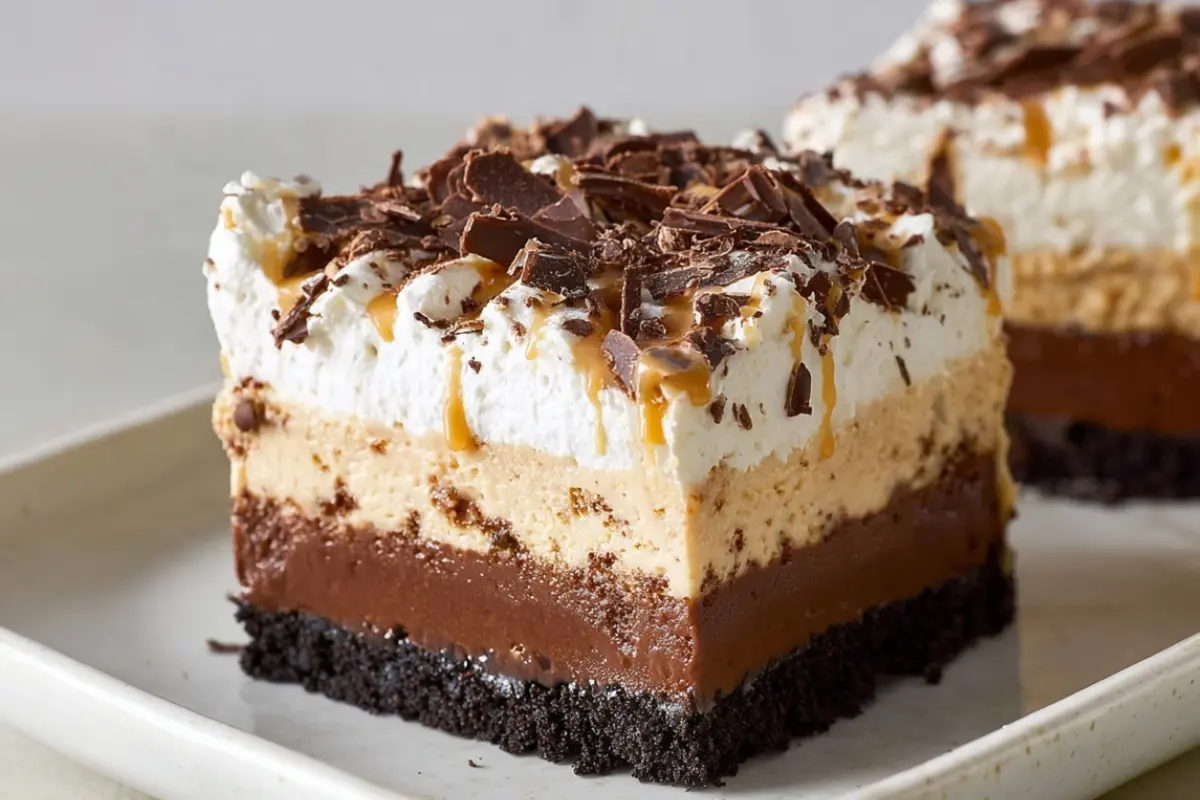
No Bake Chocolate Peanut Butter Dream Bars are the indulgent, creamy, and crunchy treat you never knew you needed — and the best part is, you don’t even have to turn on the oven. This dessert layers Oreo crust, chocolate pudding, a fluffy peanut butter cream, and whipped cream, all in one luscious slice. The combination of smooth chocolate and nutty peanut butter, supported by the crisp cookie base, creates a dessert experience that’s rich without being overly dense. Whether you’re making it for a party, bringing it along to a potluck, or just treating yourself, these bars deliver impressive flavor with minimal effort.
Why You’ll Love This Recipe
You’ll love these bars because they combine the best textures — crisp, creamy, fluffy — all in one bite. They’re layered, beautiful, and perfect for chocolate and peanut butter lovers alike (yes, that’s you). Because it’s no bake, it’s ideal for warmer weather or when you don’t want to fuss with an oven. The flavors balance beautifully: the cookie crust offers a sturdy base, the chocolate pudding layer adds richness and depth, and the peanut butter cream layer gives that classic sweet‑salty appeal. The whipped cream layer lightens the whole dessert, making each bite delightfully airy. And of course, the drizzle and chocolate shavings on top make it look as good as it tastes.
Ingredients
Here’s everything you’ll need:
-
8 ounces cream cheese (softened)
-
1 (3.9‑ounce) box instant chocolate pudding mix
-
1½ cups + 1 tablespoon cold whole or 2% milk, divided
-
6 tablespoons (¾ stick) unsalted butter
-
26 Oreo sandwich cookies (≈ 10½ ounces)
-
½ teaspoon kosher salt, divided
-
1½ cups cold heavy cream
-
¾ cup + 2 tablespoons powdered sugar, divided
-
½ cup + 1 tablespoon creamy peanut butter, divided
-
½ (≈ 2‑ounce) bar dark or milk chocolate (optional, for topping)
Optional substitution note: If you want to simplify, you can swap in thawed frozen whipped topping (like Cool Whip) for the homemade whipped cream. I’ll cover that more in the Substitutions section.
Step‑by‑Step: How to Make No Bake Chocolate Peanut Butter Dream Bars
1. Prep the pan & room‑temp cream cheese
Line an 8×8‑inch baking pan with two sheets of parchment, laid perpendicular so the paper hangs over all four sides (this creates a sling to lift out the bars later). Let the cream cheese sit at room temperature until softened (about 45 minutes).
2. Make the chocolate pudding layer
In a large bowl, whisk together the instant chocolate pudding mix and 1½ cups of the cold milk until dissolved and slightly thickened (about 2 minutes). Let this rest while you prepare the crust so it continues to set.
3. Prepare the crust
-
Melt the 6 tablespoons unsalted butter in the microwave (about 40–60 seconds on HIGH).
-
Place the Oreo cookies in a food processor and pulse into fine crumbs (about 12–15 one‑second pulses).
-
Drizzle the melted butter over the crumbs, add ¼ teaspoon of kosher salt, and pulse about 5 more times until the mixture holds together when squeezed (or, combine by hand in a bowl).
-
Press the crumb mixture into the bottom of the parchment‑lined pan, packing evenly into corners and edges. Refrigerate it while you assemble the fillings.
4. Whip the cream
Using a stand mixer or hand mixer with whisk attachment, beat the cold heavy cream and ¼ cup powdered sugar on high speed until stiff peaks form (2–4 minutes). Transfer this whipped cream into a separate bowl.
5. Make the peanut butter‑cream filling
Without wiping out the bowl, combine the softened cream cheese, ½ cup powdered sugar, ½ cup creamy peanut butter, and the remaining ¼ teaspoon kosher salt. Beat on medium speed until light and fluffy (around 3 minutes), scraping the bowl once. Then take 1 cup of the whipped cream and gently fold it into this peanut butter mixture using a flexible spatula, just until combined.
6. Layer the bars
-
Dollop and spread the thickened chocolate pudding over the cookie crust in an even layer.
-
Next, dollop and spread the peanut butter cream mixture atop the pudding layer.
-
Finally, dollop the remaining whipped cream over the peanut butter layer and spread evenly.
7. Chill
Cover the assembly and refrigerate for at least 4 hours, or preferably overnight, to allow firm setting.
8. Add drizzle and chocolate shavings
Before serving, mix together the remaining 2 tablespoons powdered sugar, 1 tablespoon peanut butter, and 1 tablespoon milk in a small bowl until smooth. Transfer to a zip‑top bag, snip off a corner, and drizzle over the bars. Optionally, use a vegetable peeler to shave pieces from the chocolate bar and scatter on top. Lift the bars out using the parchment “sling” and place on a cutting board. Use a clean, sharp knife (wipe between cuts) to slice into 12 bars.
Helpful Tips
-
Ensure all cream, milk, and cream cheese are well chilled or at proper temps before using; this helps stabilize layers.
-
When folding the whipped cream into the peanut butter mixture, do so gently—overmixing can deflate the air you whipped in.
-
Chill for a full overnight if possible: the texture improves, flavors meld, and cutting is neater.
-
Use a hot, sharp knife wiped between cuts for clean slices.
-
For easier portability, chill bars in the pan, then wrap individual bars in parchment or plastic wrap.
-
If your pudding thickens too much while you’re prepping, you can whisk in a tablespoon of extra milk to loosen it slightly.
-
For gluten‑free variation, use gluten‑free chocolate sandwich cookies instead of Oreos.
Substitutions And Variations
-
Heavy cream substitute: Replace the homemade whipped cream (1½ cups heavy cream + ¼ cup powdered sugar) with one 8‑ounce container of thawed whipped topping (e.g. Cool Whip).
-
Nut allergy option: Swap peanut butter for sunflower seed butter (if acceptable for your allergy).
-
Cookie crust variation: Use chocolate graham crackers or gluten‑free chocolate wafer cookies in place of Oreos.
-
Flavor twist: Stir a teaspoon of instant espresso into the pudding mix for a mocha note.
-
Salted caramel addition: Drizzle salted caramel sauce between layers or over the top before serving.
-
Mini version: Use a 9×9 or 9×13 pan and scale ingredient amounts proportionally; cutting into bites instead of bars works well, too.
Storage Instructions
Keep any leftover bars sealed in an airtight container and refrigerate. They’ll stay fresh for up to 4 days. The texture may soften a bit over time, but they’ll still be delicious. When serving again, you can drizzle a little extra peanut butter mixture or melted chocolate on top to refresh the look. For best results, cut only the portion you plan to eat and keep the rest chilled until serving.
Nutritional Information

-
Calories: ~ 420
-
Total Fat: ~ 27 g
-
Saturated Fat: ~ 14 g
-
Cholesterol: ~ 70 mg
-
Sodium: ~ 190 mg
-
Total Carbohydrates: ~ 39 g
-
Dietary Fiber: ~ 1 g
-
Sugars: ~ 26 g
-
Protein: ~ 6 g
Serving Suggestions
-
Serve chilled, straight from the refrigerator.
-
Garnish with extra chocolate shavings, a dusting of cocoa powder, or flaky sea salt for contrast.
-
Pair with a cold glass of milk (dairy or plant-based) or a scoop of vanilla ice cream.
-
For a party, cut into smaller squares or use mini dessert cups and layer small amounts.
-
Add fresh berries (strawberries, raspberries) on the side to cut through richness.
Frequently Asked Questions About No Bake Chocolate Peanut Butter Dream Bars
Can I freeze these bars?
Yes — you can freeze the bars for up to 1 month. Wrap them tightly in plastic wrap and then aluminum foil, or store in a freezer-safe container. Thaw in the refrigerator overnight before serving so the texture stays creamy and not icy.
Will the layers mix or collapse?
As long as ingredients are cold and whipped cream is gently folded, the layers should remain distinct. Chill long enough (4 hours or more) to allow them to set firmly.
Can I make this in a different pan size?
Yes, you can adapt to 9×9 or 9×13 pans, adjusting ingredient amounts pro rata. Just make sure layers aren’t too thin or too deep.
What if I don’t have a food processor for the Oreo crust?
You can place the cookies in a resealable plastic bag and crush them with a rolling pin until they’re fine crumbs. Then mix with melted butter and salt in a separate bowl.
Why did my bars turn out soggy or runny?
Possible causes: pudding mixture too loose (maybe you added excess milk), whipped cream underwhipped, or insufficient chilling time. Next time, be sure to whip cream until stiff peaks, chill thoroughly, and measure ingredients accurately.
Can I reduce the sugar or use sugar substitute?
You could reduce powdered sugar slightly, but it may affect texture or cause the filling to flatten. Sugar substitutes may not provide the same stability unless they’re powdered and suited for baking-type use.
Conclusion
I hope you love making and eating these No Bake Chocolate Peanut Butter Dream Bars as much as I do. They’re a dreamy mashup of textures and flavors — creamy, crunchy, chocolatey, and nutty — and best of all, they’re simple to assemble since there’s no baking involved. Thank you for joining me in the kitchen today — your enthusiasm for sweet treats inspires me. It means so much to me that you’re part of this food‑loving community. Enjoy every luscious bite of these bars, and may your dessert moments be as easy and delicious as this recipe promises. Happy baking!
Join us on Pinterest for new mouthwatering recipes every day!
Print
No Bake Chocolate‑Peanut Butter Dream Bars
- Total Time: 12 bars
- Yield: Dessert
Description
No-Bake Chocolate Peanut Butter Dream Bars are a chilled, layered dessert made with an Oreo cookie crust, chocolate pudding, peanut butter cream, and whipped cream. Perfect for hot days, parties, or any time you want a rich and creamy treat without turning on the oven.
Ingredients
8 oz cream cheese, softened
1 (3.9 oz) box instant chocolate pudding mix
1½ cups + 1 tbsp cold whole or 2% milk, divided
6 tbsp unsalted butter
26 Oreo sandwich cookies (about 10.5 oz)
½ tsp kosher salt, divided
1½ cups cold heavy cream
¾ cup + 2 tbsp powdered sugar, divided
½ cup + 1 tbsp creamy peanut butter, divided
½ (≈ 2 oz) bar dark or milk chocolate (optional, for topping)
Instructions
Prep the pan & room‑temp cream cheese
Line an 8×8‑inch baking pan with two sheets of parchment, laid perpendicular so the paper hangs over all four sides (this creates a sling to lift out the bars later). Let the cream cheese sit at room temperature until softened (about 45 minutes).
2. Make the chocolate pudding layer
In a large bowl, whisk together the instant chocolate pudding mix and 1½ cups of the cold milk until dissolved and slightly thickened (about 2 minutes). Let this rest while you prepare the crust so it continues to set.
3. Prepare the crust
-
Melt the 6 tablespoons unsalted butter in the microwave (about 40–60 seconds on HIGH).
-
Place the Oreo cookies in a food processor and pulse into fine crumbs (about 12–15 one‑second pulses).
-
Drizzle the melted butter over the crumbs, add ¼ teaspoon of kosher salt, and pulse about 5 more times until the mixture holds together when squeezed (or, combine by hand in a bowl).
-
Press the crumb mixture into the bottom of the parchment‑lined pan, packing evenly into corners and edges. Refrigerate it while you assemble the fillings.
4. Whip the cream
Using a stand mixer or hand mixer with whisk attachment, beat the cold heavy cream and ¼ cup powdered sugar on high speed until stiff peaks form (2–4 minutes). Transfer this whipped cream into a separate bowl.
5. Make the peanut butter‑cream filling
Without wiping out the bowl, combine the softened cream cheese, ½ cup powdered sugar, ½ cup creamy peanut butter, and the remaining ¼ teaspoon kosher salt. Beat on medium speed until light and fluffy (around 3 minutes), scraping the bowl once. Then take 1 cup of the whipped cream and gently fold it into this peanut butter mixture using a flexible spatula, just until combined.
6. Layer the bars
-
Dollop and spread the thickened chocolate pudding over the cookie crust in an even layer.
-
Next, dollop and spread the peanut butter cream mixture atop the pudding layer.
-
Finally, dollop the remaining whipped cream over the peanut butter layer and spread evenly.
7. Chill
Cover the assembly and refrigerate for at least 4 hours, or preferably overnight, to allow firm setting.
8. Add drizzle and chocolate shavings
Before serving, mix together the remaining 2 tablespoons powdered sugar, 1 tablespoon peanut butter, and 1 tablespoon milk in a small bowl until smooth. Transfer to a zip‑top bag, snip off a corner, and drizzle over the bars. Optionally, use a vegetable peeler to shave pieces from the chocolate bar and scatter on top. Lift the bars out using the parchment “sling” and place on a cutting board. Use a clean, sharp knife (wipe between cuts) to slice into 12 bars.
Notes
Swap heavy cream and sugar for 8 oz whipped topping if desired.
Chill overnight for best texture and cleanest cuts.
Use gluten-free cookies for a GF version.
Store in fridge up to 4 days in an airtight container.
- Prep Time: 30 minutes
- Cook Time: 4 hours 30 minutes
Nutrition
- Serving Size: 1 bar
- Calories: ~420
- Sugar: ~26g
- Carbohydrates: ~39g
- Protein: ~6g