
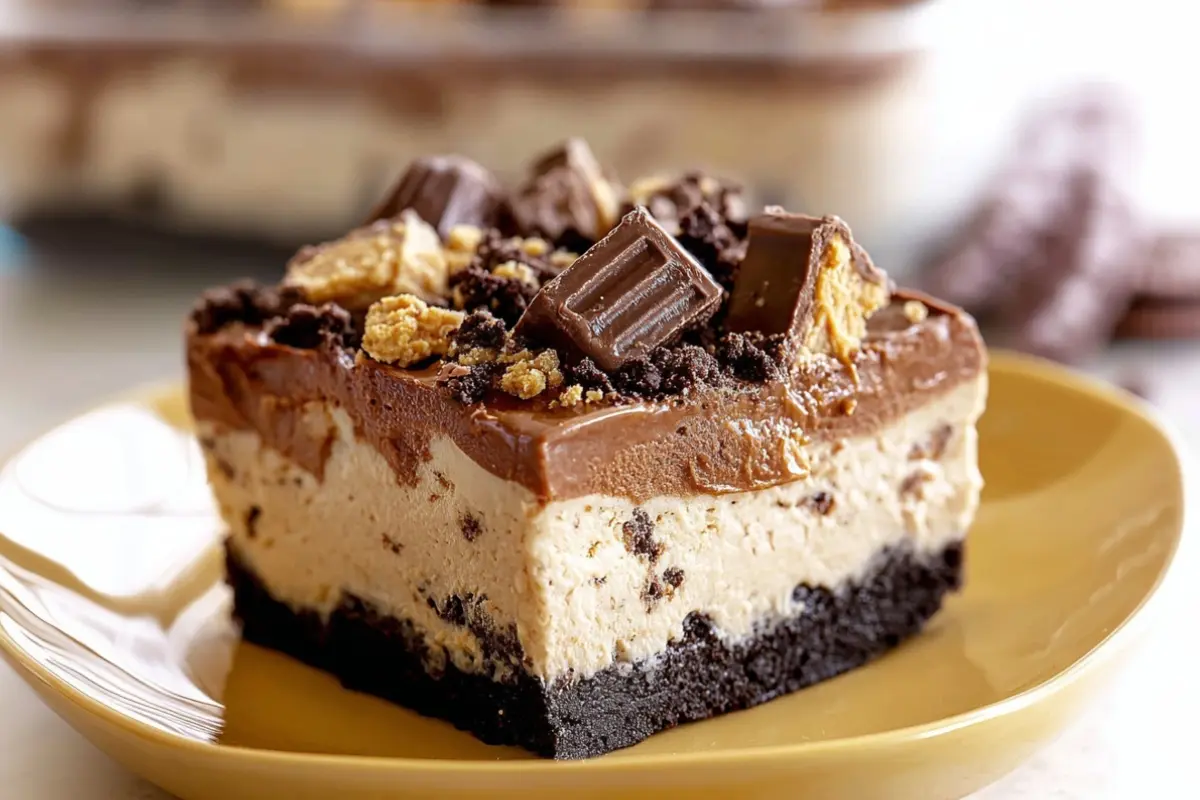
No Bake Chocolate Peanut Butter Dessert is the perfect indulgence for those moments when you crave something rich, creamy, and delicious, without turning on the oven. This dessert layers a buttery cookie crust with a smooth peanut‑butter cream, followed by a chocolate pudding topping and crunchy cookie/peanut butter cup pieces. It takes minimal effort yet delivers maximum flavor, making it ideal for parties, potlucks, or a cozy treat at home.
Why You’ll Love This Dessert
You’ll love this no‑bake creation because it combines two universally adored flavors — chocolate and peanut butter — in one luscious dessert. The contrast of textures is a standout: a crisp Oreo cookie crust, a creamy peanut butter‑cream layer, a silky chocolate pudding layer, and finally the crunch of cookie crumbs and chopped peanut butter cups on top. It requires no baking, which means less fuss, less heat in the kitchen, and a quicker path to enjoying something decadent. Plus, the layered look is impressive while the prep is straightforward.
Ingredients
-
20 Oreo cookies, divided
-
2 tablespoons butter, softened
-
1 package (8 ounces) cream cheese, softened
-
½ cup peanut butter
-
1 cup powdered sugar
-
1 carton (16 ounces) frozen whipped topping (thawed), divided
-
20 miniature Reese’s peanut butter cups, chopped and divided (cut into halves or quarters)
-
1 cup cold milk
-
1 package (3.9 ounces) instant chocolate fudge pudding mix
Step‑by‑Step: How to Make No Bake Chocolate Peanut Butter Dessert
-
Crush 16 of the Oreo cookies (you can use a food processor or place them in a bag and smash with a rolling pin). Mix the cookie crumbs with the softened butter in a small bowl.
-
Press the crumb‑butter mixture firmly into the bottom of a 9‑inch pan to form the crust.
-
In a large bowl using an electric mixer, beat the softened cream cheese, peanut butter, and powdered sugar until smooth and well combined.
-
Fold in half of the thawed whipped topping. Then spread this peanut butter‑cream mixture evenly over the prepared cookie crust. Sprinkle half of the chopped peanut butter cups over this layer.
-
In a separate bowl, prepare the instant chocolate fudge pudding according to the package instructions using the cold milk. After the pudding has set slightly (per package timing), fold in the remaining whipped topping.
-
Spread the chocolate‑pudding/whipped topping mixture over the peanut butter/cup layer.
-
Crush the remaining 4 Oreo cookies and sprinkle them over the top. Finish by sprinkling the remaining chopped peanut butter cups.
-
Chill the dessert in the fridge for 2‑3 hours (or until set) before serving.
Helpful Tips
-
For best results, ensure your cream cheese and peanut butter are fully softened (room temperature) to allow smooth mixing.
-
Press the crust firmly and evenly — use the back of a spoon or a flat-bottom glass.
-
When folding in the whipped topping, use a gentle hand to maintain lightness (don’t over‑mix).
-
Make sure the pudding is not hot when you fold in the whipped topping (as that could deflate it or melt the topping).
-
Chill sufficiently — this dessert benefits from being well‑set to make clean slices and proper layering.
-
When serving, try to use a clean, sharp knife or an offset spatula for neat portions.
-
If making ahead, add the final cookie‑crumb/peanut‑butter‑cup topping just before serving to preserve the crunch.
Substitutions And Variations
-
Substitute the Oreo cookies with another chocolate sandwich cookie if preferred (e.g., chocolate wafers or gluten‑free cookies).
-
For the crust butter, you can use melted coconut oil if you want a dairy‑free option (assuming toppings are compatible).
-
Swap regular peanut butter for a “natural” or “no‑stir” peanut butter variant — you may need to reduce salt or sugar elsewhere if using salted peanut butter.
-
If you’d rather a deeper chocolate layer, use dark‑chocolate pudding mix instead of “fudge” or add a tablespoon of cocoa powder to the pudding if you like.
-
For a nut‑free version, replace peanut butter with sunflower‑seed butter and use allergen‑safe cups or chopped roasted seeds instead of peanut butter cups.
-
To lighten it up, use reduced‑fat cream cheese or a lighter whipped topping; however, note this may affect the richness and texture slightly.
-
You can add a layer of chopped roasted peanuts or toffee bits between layers for extra crunch.
-
Serve individual cups instead of a 9‑inch pan for portion control or presentation – layer in small dessert glasses.
Storage Instructions
Cover the dessert tightly with plastic wrap or use an airtight lid and keep refrigerated. It will stay nicely set for up to 3–4 days in the fridge. The cookie topping might soften a bit over time — for maximum crunch, you can add fresh cookie crumbs or peanut butter cup pieces just before serving. Avoid leaving it at room temperature for more than an hour (especially if your whipped topping or pudding contain dairy ingredients) to maintain food safety.
Serving Suggestions

-
Serve chilled directly from the fridge, ideally with a dollop of extra whipped topping and a fresh peanut butter cup or cookie crumb on top for presentation.
-
Mini‑dessert versions: Portion into small jars or dessert glasses for individual servings — great for parties.
-
Pair with a scoop of vanilla ice cream or a simple fresh‑fruit side (e.g., sliced strawberries or banana) to balance the richness.
-
For a nice contrast in temperature and texture: add a few fresh raspberries on top for tartness.
-
If serving to a crowd, garnish the tray with whole peanut butter cups and cookie crumbs scattered around for visual appeal.
-
Consider serving with coffee or a light dessert wine — the strong peanut‑butter/chocolate flavour pairs well with something that cuts the sweetness.
Frequently Asked Questions About No Bake Chocolate Peanut Butter Dessert
Can I make this dessert ahead of time?
Yes — you can assemble the dessert and refrigerate it for several hours ahead (2–3 hours minimum to set, or up to 24 hours in advance). If making the day before, it’s best to wait to add the final crunchy cookie crumb/peanut butter cup topping just before serving to preserve the texture.
What if I can’t find miniature peanut butter cups?
No problem! You can substitute with chopped regular‑size peanut butter cups, or use chopped peanut butter candies, chopped roasted peanuts plus caramel bits, or even chocolate chunks mixed with peanut butter for a similar flavour profile.
Can I freeze this dessert?
It’s not ideal to freeze, because the whipped topping and pudding layers may change texture when frozen and thawed (they can become watery or crystalised). It’s best enjoyed chilled (refrigerated) rather than frozen.
How do I make sure the layers stay distinct when I cut and serve?
Chill the dessert long enough until it’s well set (2‑3 hours or more). Use a sharp knife dipped in hot water and wiped clean between cuts — this helps maintain clean edges of each layer. Serve straight from the fridge.
Could I lighten this dessert for a lower‑calorie version?
Yes — you could try using reduced‑fat cream cheese, a lighter whipped topping (or use half the amount), a low‑sugar instant pudding mix, or fewer peanut butter cups on top. Keep in mind that any reduction might change the texture, richness or flavour slightly, but it can still be delicious.
Conclusion
Thank you so much for making this No Bake Chocolate Peanut Butter Dessert — it’s truly one of my favourite go‑to treats for when I want something indulgent yet easy. The layers of cookie crust, smooth peanut butter cream, rich chocolate pudding and crunchy topping bring together such amazing contrast and flavour — and all without turning on the oven. I hope you enjoy making it as much as I do sharing it. May your kitchen be full of joy and sweet aromas, and may this dessert become a favourite in your own recipe collection too.
Join us on Pinterest for new mouthwatering recipes every day!
Print
No Bake Chocolate Peanut Butter Dessert
- Total Time: 2 hours 25 minutes (includes chilling)
- Yield: 12 servings 1x
Description
This No Bake Chocolate Peanut Butter Dessert features layers of crushed Oreos, peanut butter cream cheese filling, and a rich chocolate pudding topping. It’s a creamy, make-ahead treat that’s perfect for any occasion.
Ingredients
20 Oreo cookies, divided
2 tablespoons butter, softened
1 package (8 ounces) cream cheese, softened
½ cup peanut butter
1 cup powdered sugar
1 carton (16 ounces) frozen whipped topping, thawed, divided
20 miniature Reese’s peanut butter cups, chopped and divided (cut into halves or quarters)
1 cup cold milk
1 package (3.9 ounces) instant chocolate fudge pudding mix
Instructions
-
Crush 16 of the Oreo cookies (you can use a food processor or place them in a bag and smash with a rolling pin). Mix the cookie crumbs with the softened butter in a small bowl.
-
Press the crumb‑butter mixture firmly into the bottom of a 9‑inch pan to form the crust.
-
In a large bowl using an electric mixer, beat the softened cream cheese, peanut butter, and powdered sugar until smooth and well combined.
-
Fold in half of the thawed whipped topping. Then spread this peanut butter‑cream mixture evenly over the prepared cookie crust. Sprinkle half of the chopped peanut butter cups over this layer.
-
In a separate bowl, prepare the instant chocolate fudge pudding according to the package instructions using the cold milk. After the pudding has set slightly (per package timing), fold in the remaining whipped topping.
-
Spread the chocolate‑pudding/whipped topping mixture over the peanut butter/cup layer.
-
Crush the remaining 4 Oreo cookies and sprinkle them over the top. Finish by sprinkling the remaining chopped peanut butter cups.
-
Chill the dessert in the fridge for 2‑3 hours (or until set) before serving.
Notes
Use room temperature cream cheese and peanut butter for smoother mixing.
Chill dessert thoroughly for clean slices.
Swap Oreos for gluten-free cookies if needed.
Add toppings just before serving for crunch.
- Prep Time: 25 minutes
- Cook Time: 0 minutes
- Category: Dessert
Nutrition
- Serving Size: 1 slice
- Calories: 340
- Sugar: 22g
- Carbohydrates: 34g
- Protein: 5g